Agents
The Waratek Agent is a lightweight plugin for both Java and .NET based applications. It connects to the Portal where you can monitor and attach security Rules to it.
Overview
The Waratek Agent runs on the machine to be protected and is assigned to an application on that machine or server, such as WebSphere. When the application (WebSphere in this example) starts, it loads the Waratek Agent into memory as it starts up. The Waratek Agent then reads its rules and protects that application as dictated by the policy and its rules.
The Agent connects to the Portal to report security events. Within the Portal, Agents are aggregated into groups called Applications. Security policies that are applied to these Applications are inherited by each Agent that is part of that Application. For more information on Policies, Mods, and Rules, see the Policies section of the User Guide.
Creating and Registering a new Agent in the Portal
By default, for the Linux system, the Waratek Agent software is installed on /opt/waratek. For more details, please refer to the page Java Agent Documentation
An agent is an application running on the remote server. The Portal is designed to monitor multiple agents distributed among the different servers. Before using these features, you must first register the agent in the Portal UI.
To register the agent in the Portal, add the extra properties into the waratek.properties under the configuration folder. For more details please refer to the Agent Documentation.
Each agent saves its configurations in a separate configuration folder. The waratek.properties file, the security rules and the log file can all be saved in these folders. To setup the agent:
- Go to one of configuration folders and open the
waratek.propertiesfile. - Add the following lines to the
waratek.properties
com.waratek.ControllerPresent=<true|false>
com.waratek.ControllerHost=<IP address of the Portal, i.e. 127.0.0.1>
com.waratek.ControllerPort=8443
com.waratek.rules.local=<full/path/to/policy.armr>
com.waratek.log.file=<full/path/to/security.log>
com.waratek.rules.autoreload=<true|false>

# enables communication using self-signed SSL certificate:
com.waratek.ControllerSSLCertificateValidation=<true|false>
com.waratek.ElasticsearchPresent=<true|false>
com.waratek.ElasticsearchSecure=<true|false>
com.waratek.ElasticsearchHost=<IP address of the Elasticsearch e.g. 127.0.0.1>
com.waratek.ElasticsearchPort=<e.g. 9200>
com.waratek.ElasticsearchKey=<Password for accessing Elasticsearch from the MC which is in the readonlyrest.yml file. i.e. Testpass123>
Once the setup is completed, the agent will attempt to register with the Portal and it will add the credentials at the instance.waratek.properties file.
Here is an example of the credentials:
########################################################

# THIS WAS GENERATED BY THE CONTROLLER - DO NOT MODIFY #

oceanic.NodeId=ENC(LpUMEFSD4rjSN7zF81bRQg==)
oceanic.NodePassword=ENC(ZYOpnCWTNq75wR0MThJP/RJDf+m94XVx25cVEU6a2/4=)

########################################################
Managing Agents in the Portal
Once you log into the Portal, you can click on the Agents tab in the main navigation to access the Agent management interface.
In the Agent management interface, you can access the drop down menu in the top left of the screen to filter the table by agent state (Assigned Agents, Unassigned Agents, and Deleted Agents). These filtered views provide a row of information for each agent. For the Assigned Agents and Unassigned Agents views, there is an option to select any agent and delete it. All deleted agents will appear in the Deleted Agents view for future reference.
The Events column on this table can have one of four different status values:
- Delivered: All events are delivered.
- Awaiting Delivery: Not all events have been delivered. There are events queued for delivery.
- None: The agent has no events to send.
- Unknown: The agent does not support this feature.
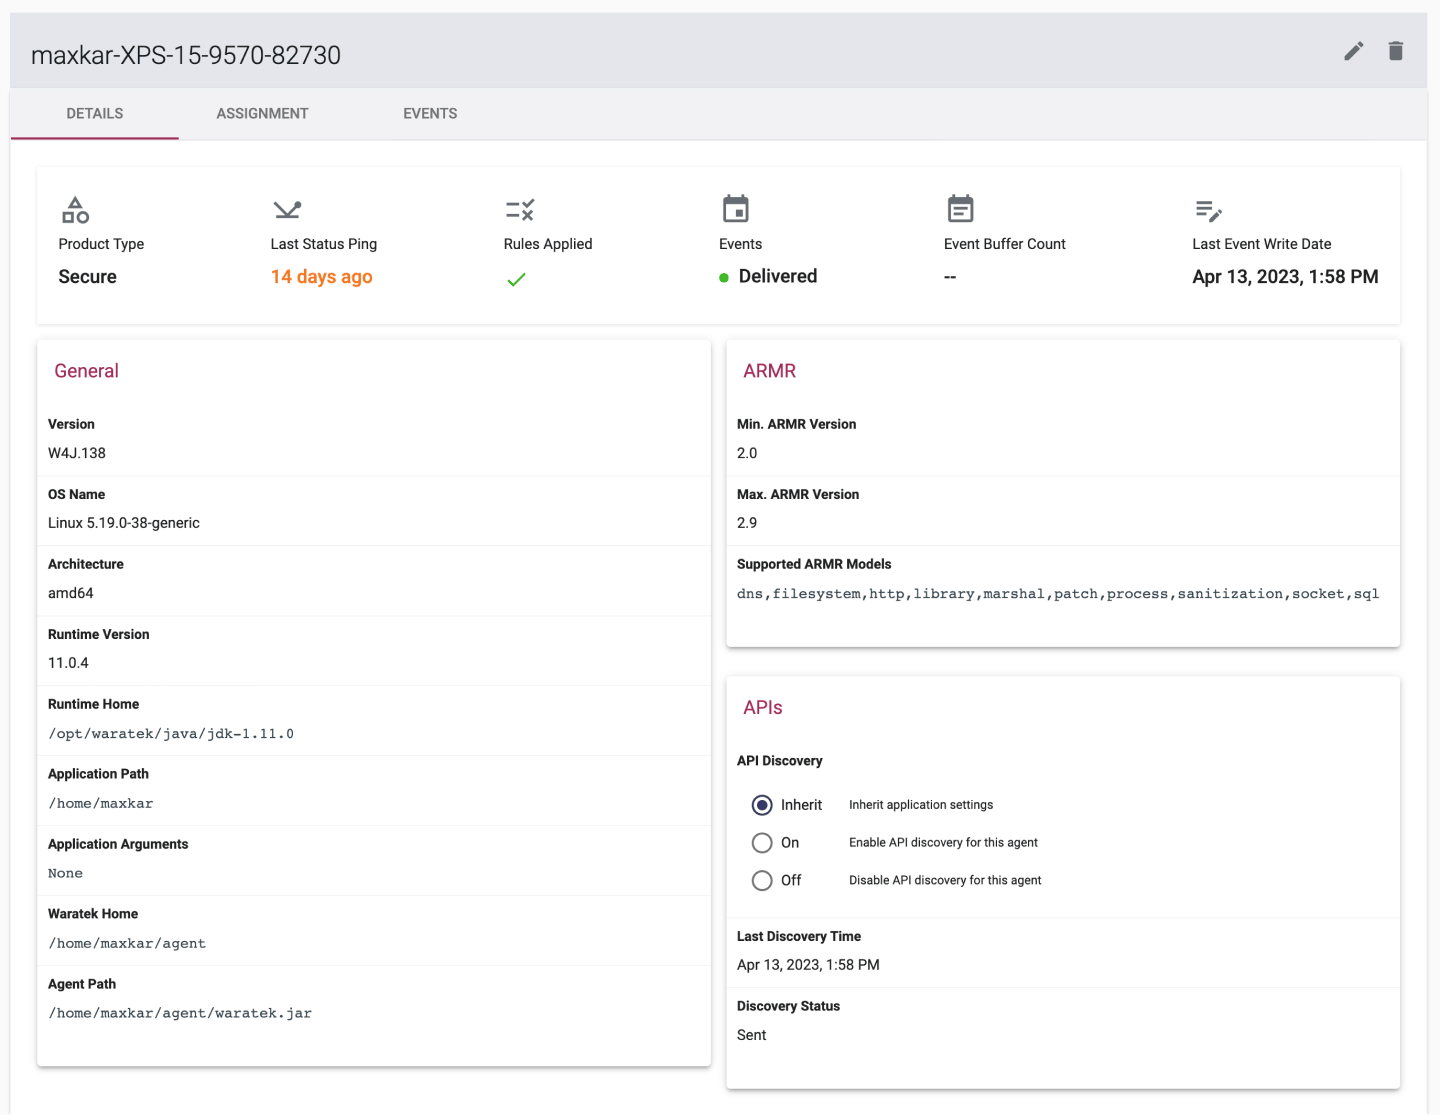
For more details about any agent, you can click on an icon  beside the Agent Name and open the Agent Details page. This page provides an overview of that agent's activity and a series of cards detailing specific properties for that agent. From here, you can change the API Discovery settings for the agent if desired. The agent can be set to inherit the discovery settings of the application it is attached to or it can be turned on/off as a standalone action.
Searching an Agent
- Click the Agents tab in the main navigation at the top of the screen.
- Type the agent details in the search box. These details can be any one of the fields available across the table
- The table view will update in real time as you type your search entry
Viewing the Details of an Agent
- Click on the Agents tab in the main navigation at the top of the screen.
- Click on the icon beside the specific Agent Name within the table.
- The agent details page will open with the Overview tab displayed by default.
Renaming an Agent
- Click the Agents tab in the main navigation at the top of the screen.
- Click on the icon beside the Agent Name you want to change and the agent details page will open.
- Click the icon button
 to enter a new name in the pop-up dialog and then click the button Rename to confirm.
When an agent first connects to the Portal, its display name is set from the agent.name property (if configured) or auto-generated from the agent's hostname. You can rename the agent at any time using the steps above. The Portal-set name takes priority and persists across agent restarts and reconnections.
Deleting an Agent
- Click the Agents tab in the main navigation at the top of the screen.
- Click on the icon beside the Agent name you want to delete and the agent details page will open.
- Click the icon button
 and then click the button Delete Agent in the pop-up dialog to confirm the deletion.
Agent Deployment Report
This consolidated report of the online agents on a Portal Dedicated instance will assist you in determining how many licences you are using at a given time. The report can be generated by clicking on the Deployment Report button on the top right of the agents overview page. The pdf report contains the following information:
- The total number of online agents
- Total number of agents (non-deleted)
- The date the report was run
- List of agent IDs, agent name, product type, names and versions (for non-deleted agents)
Agent Lifecycle Events
Agent lifecycle events are listed under the Events tab on the Agent Details page:
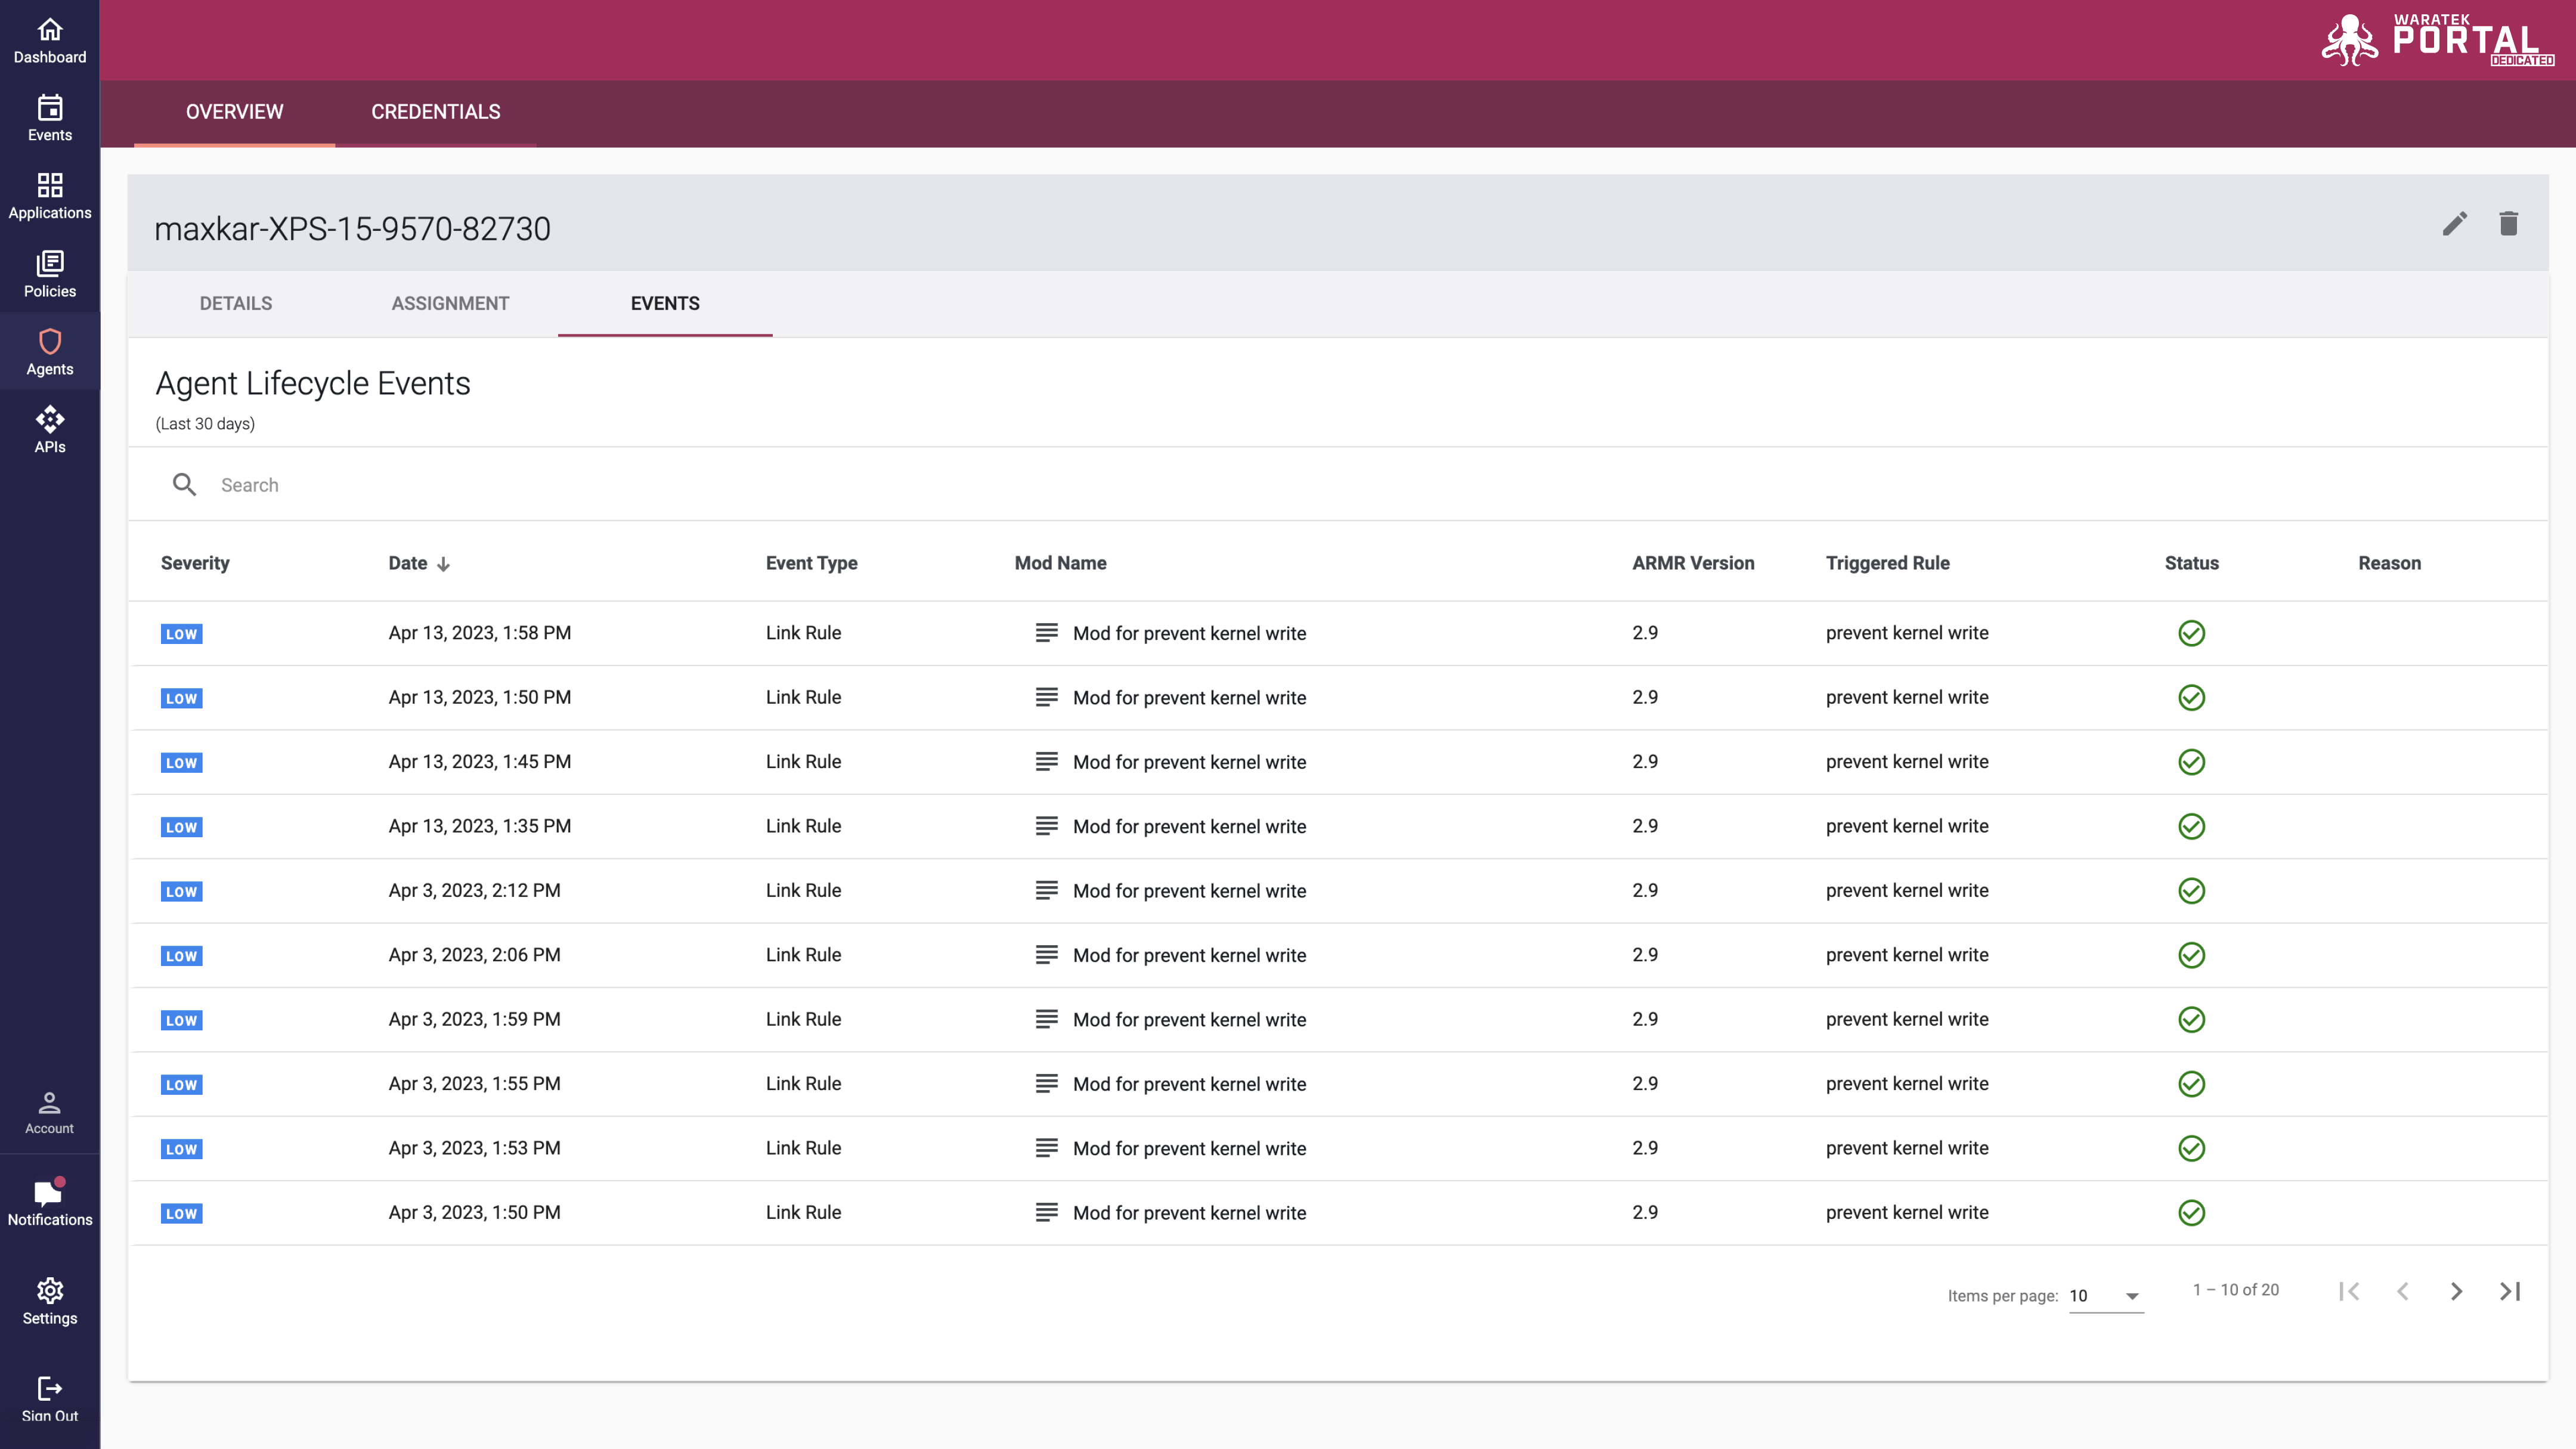
These events include Link Rule and Syntax Error events. The status column indicates whether the rule was successfully applied by the agent. When a Link Rule error or Syntax Error occurs, the rule or mod is not applied by the agent, and therefore the application is not protected by that rule or mod.
Syntax Error events can occur when the Agent does not support the mod ARMR version. In this scenario, the mod ARMR version should be changed to the appropriate version which is supported by the agent. The agent's supported ARMR versions are listed on the Agent Details page. The mod ARMR version can be upgraded on the Mod details page, but it cannot be downgraded - a new mod must be created to downgrade.
Link Rule error events can occur when the mod contains configurations of rules which the agent does not support. A reason field is provided that explains why the error occurred. In this scenario, the rules should be modified to prevent this error from occurring. Refer to this User Guide's Rules Wizard documentation for the rule type to determine which changes are necessary.
Automatic Agent Purging
The agent purging feature is mainly geared toward environments with high agent volatility, such as cloud or other on-demand services where new agents and the services that they are protecting may be created, spun up, and subsequently spun down with regularity. It is configured at the Application level, therefore for more information on Automatic Agent Purging, see the Application section of the User Guide.