Policies
Policies are a collection of Mods and Rules that tell Agents how to behave when certain security events occur. Policies, Mods, and Rules are the basic components that make up the Portal's Policy system. These components are created using Waratek's ARMR language.
Policy Components
Rules are machine-readable definition files that use ARMR code to instruct the Waratek Agents on how to behave: what security events to detect, block, or allow. Each rule must be contained within an ARMR Mod.
Each rule has a Type, some examples are Deserialization, HTTP Open-redirect, CSRF, XSS, etc.
Mods (short for “Modifications”) are a container or group for rules. Every rule must be in a Mod. Some Mods may contain only a single rule, and some could contain dozens or hundreds of rules. Mods do not have a Type like Rules. They are a wrapper or grouping mechanism.
Virtual Patches created by Waratek are a type of Mod and are shipped as an ARMR file. They may contain anything from one to hundreds of rules.
A Policy is a collection of one or more Mods. Policies are applied to an Application. The Application will then inform the individual Agents assigned to it that a new policy or policy updates are available for consumption, and the individual Agents will download and apply the policy.
ARMR
ARMR is a Waratek Security DSL (Domain Specific Language) used to create instructions for the Waratek Agents in the form of individual Rules, Mods, Policies, and Virtual Patches. ARMR is:
- The language that the Rules are written in
- The language that creates the wrappers for these rules in the form of Mods and Virtual Patches
- The language that creates the wrapper for Mods and Patches in the form of Policies.

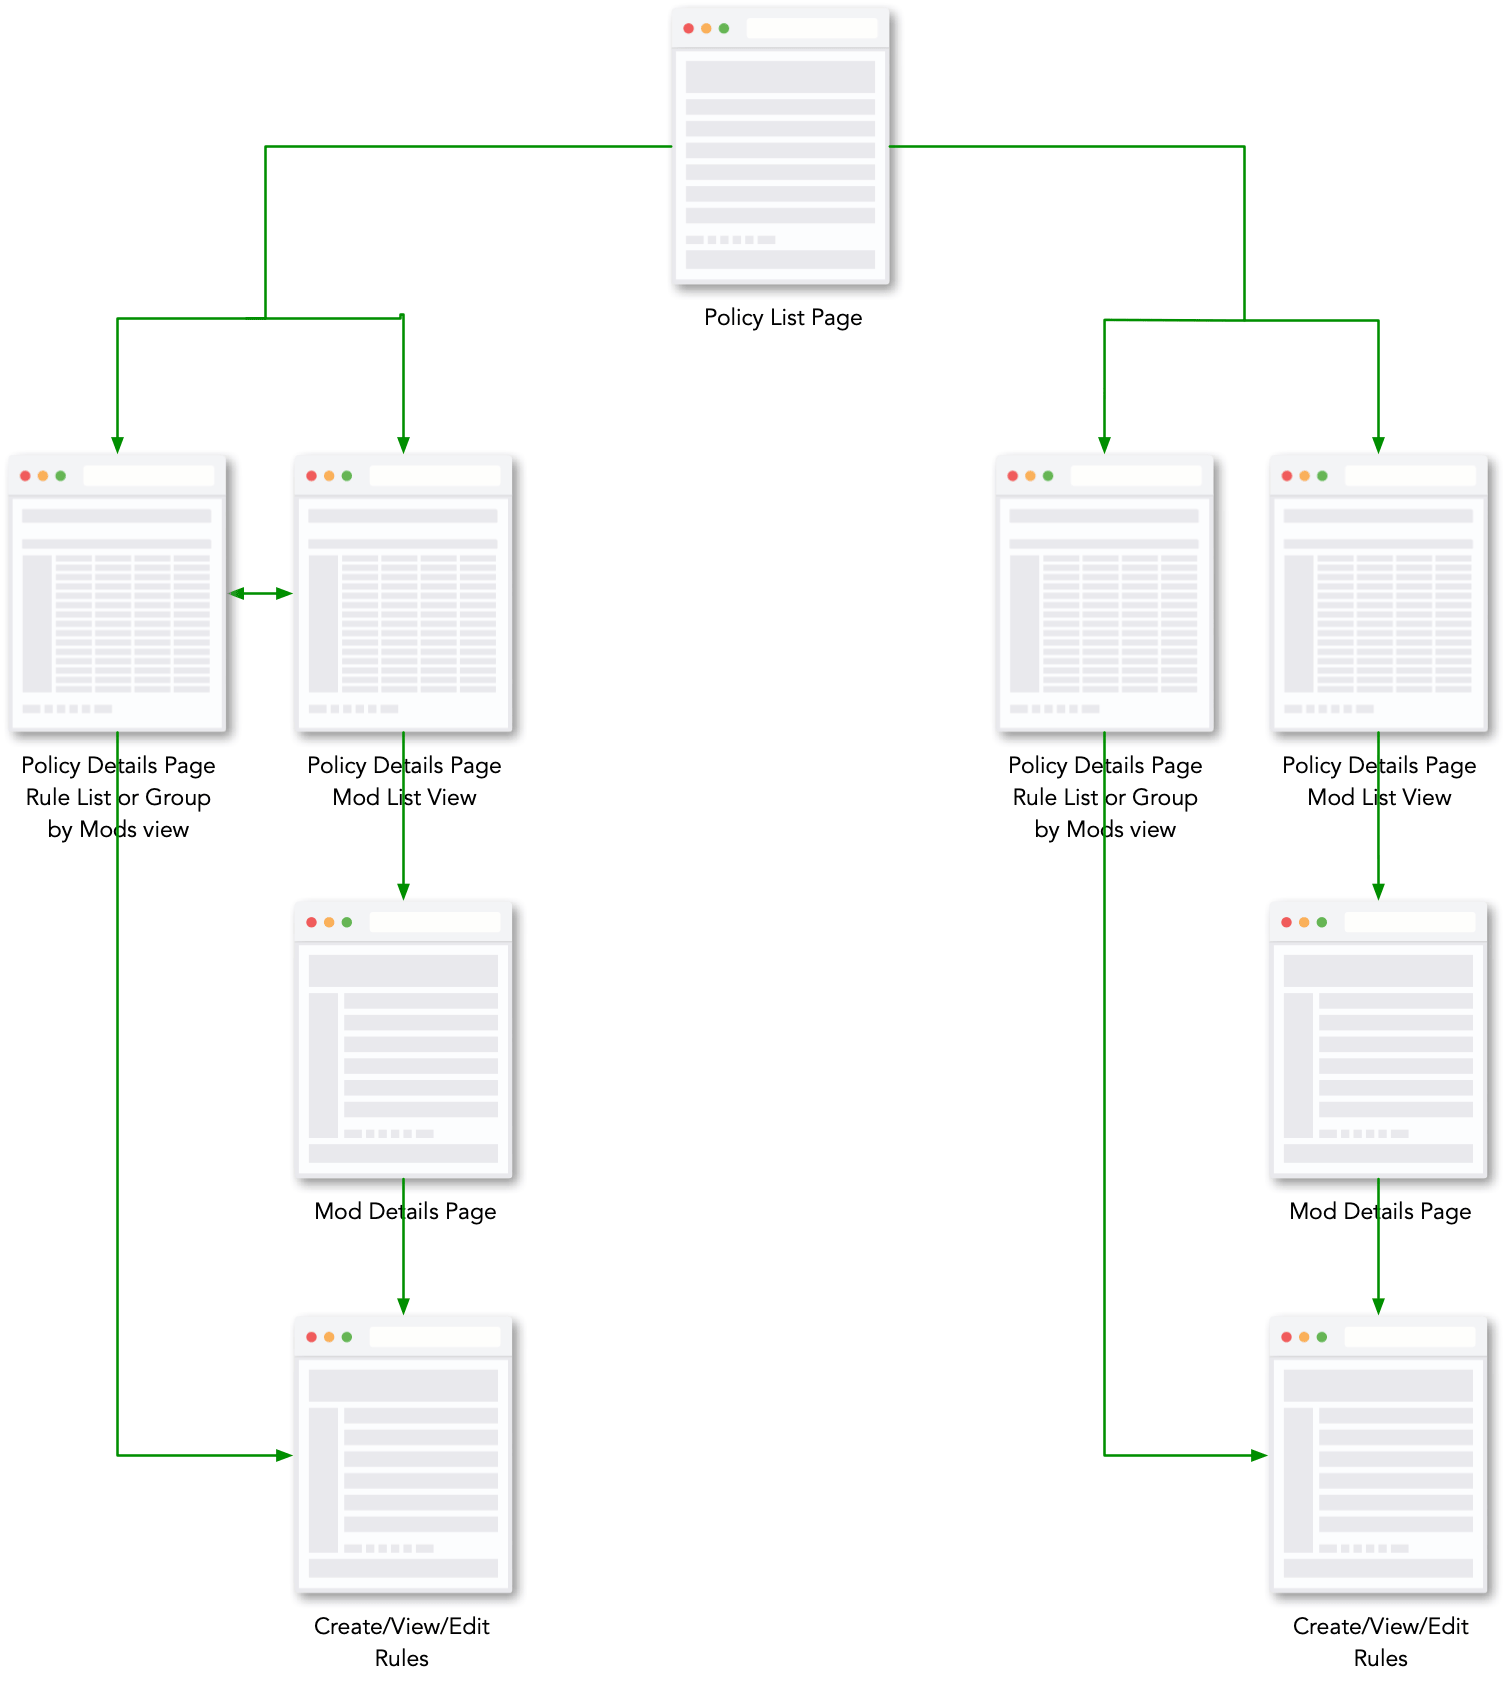
Policy Architecture and Navigation
The Waratek Policy system follows a simple and logical workflow.
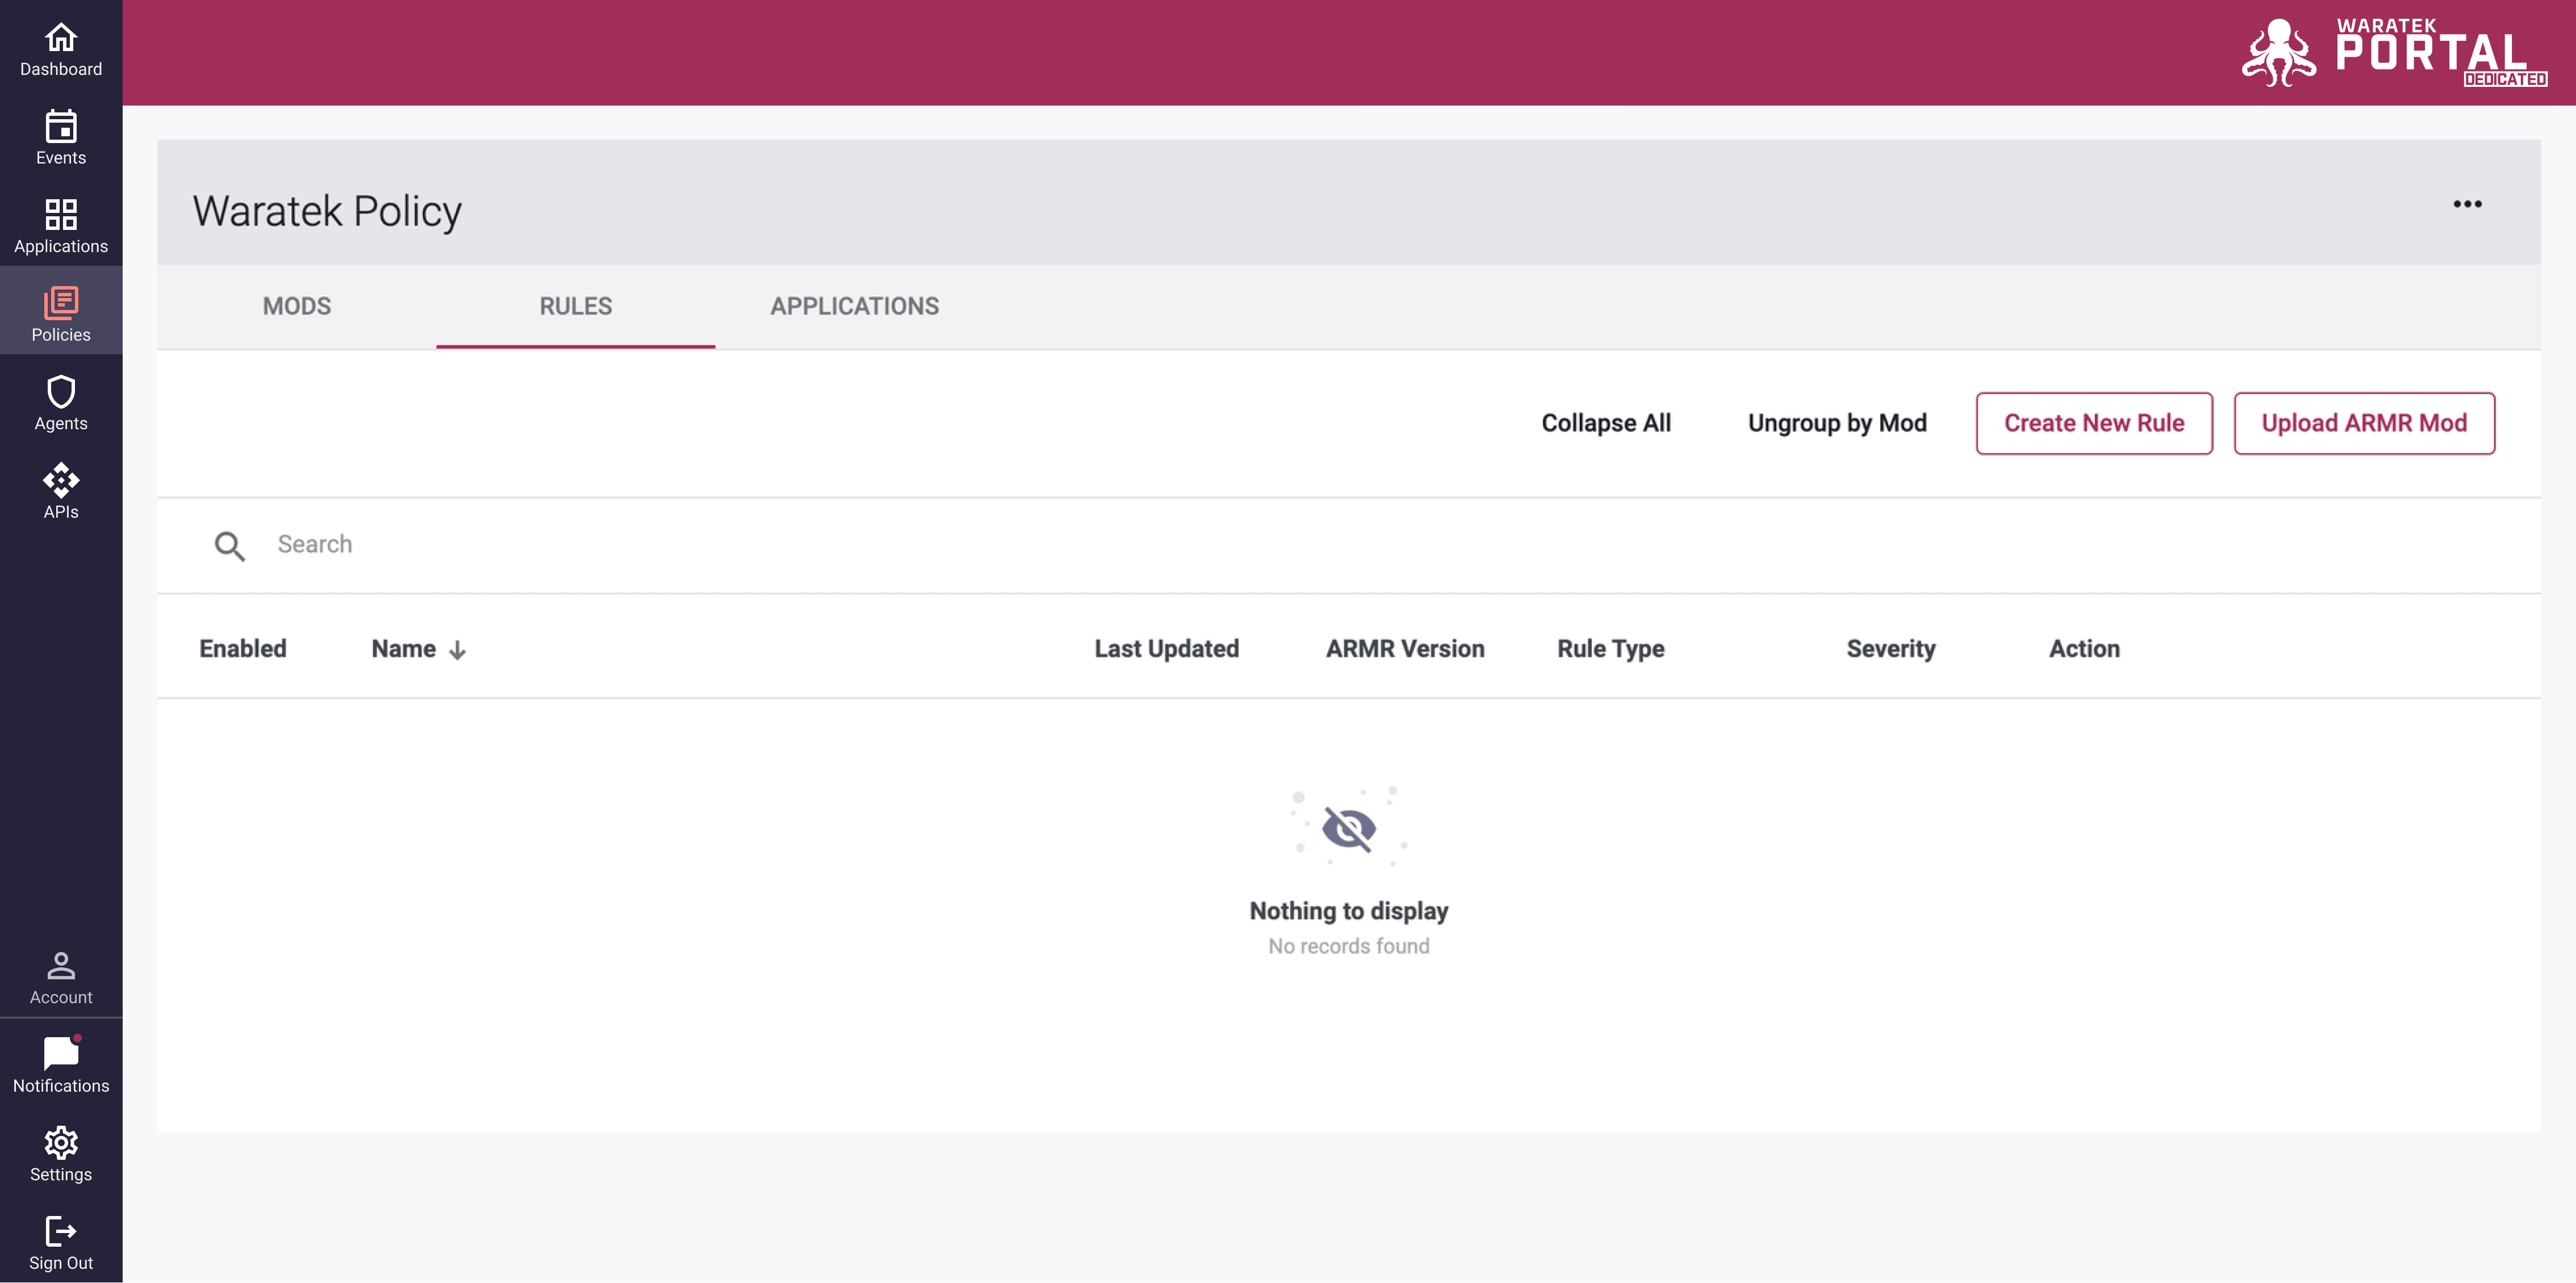
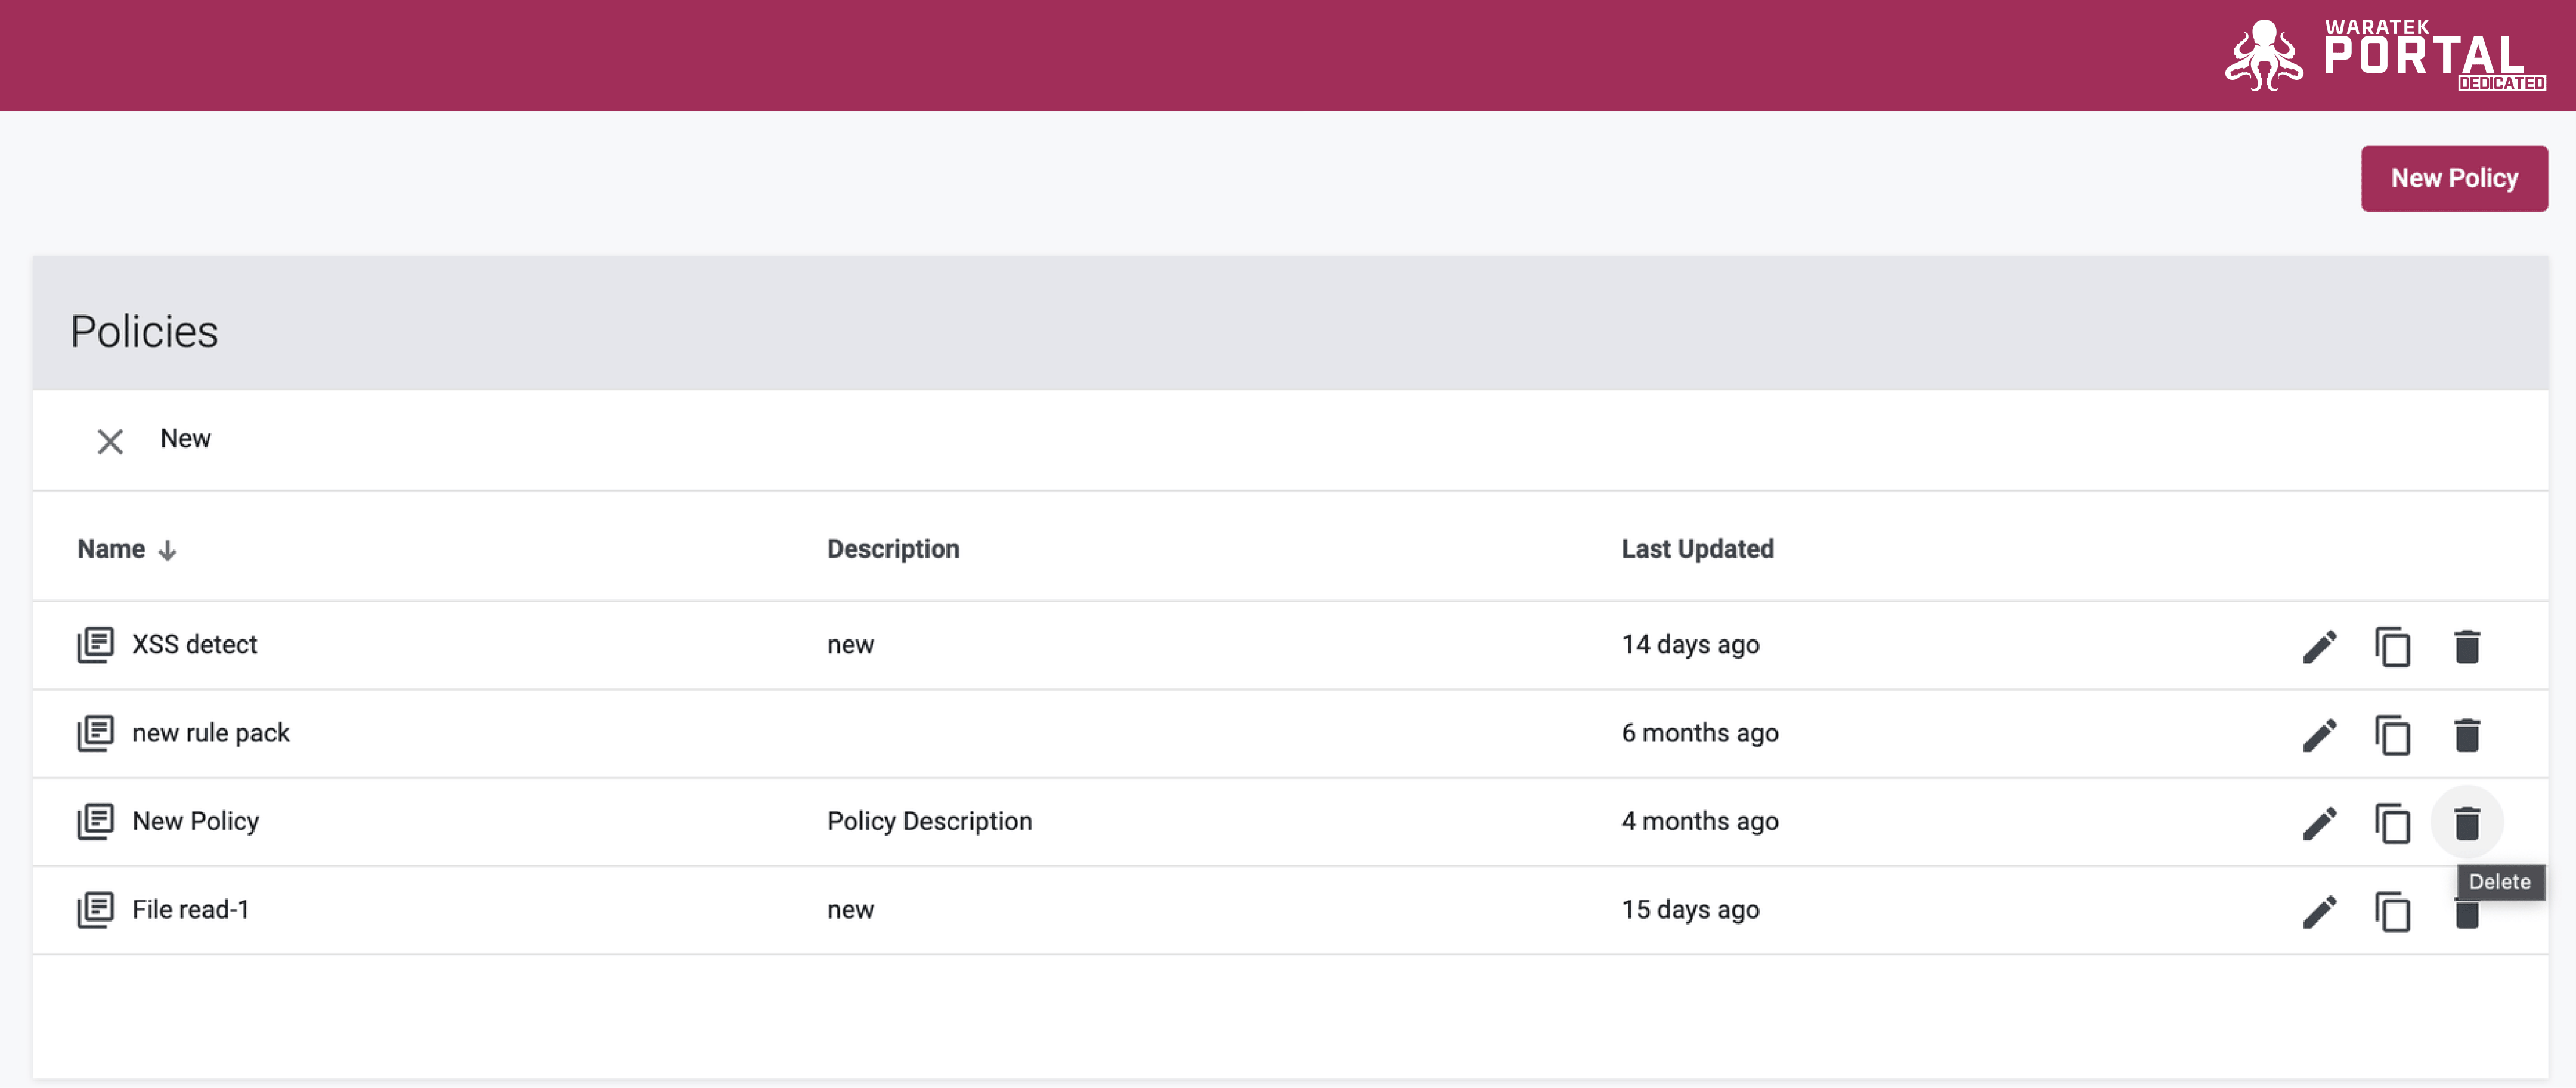
At the highest level, under the Policies tab in the top navigation, you are presented with the Policy List view; a list of all of the policies within the system.
If you click on an icon  beside any Policy Name from the list, you will be taken to the Policy Details view which provides further information about the policy: what mods are contained within that policy and to which Applications the policy has been applied. Within the Policy Details view there are several ways in which to view the contents of the policy:
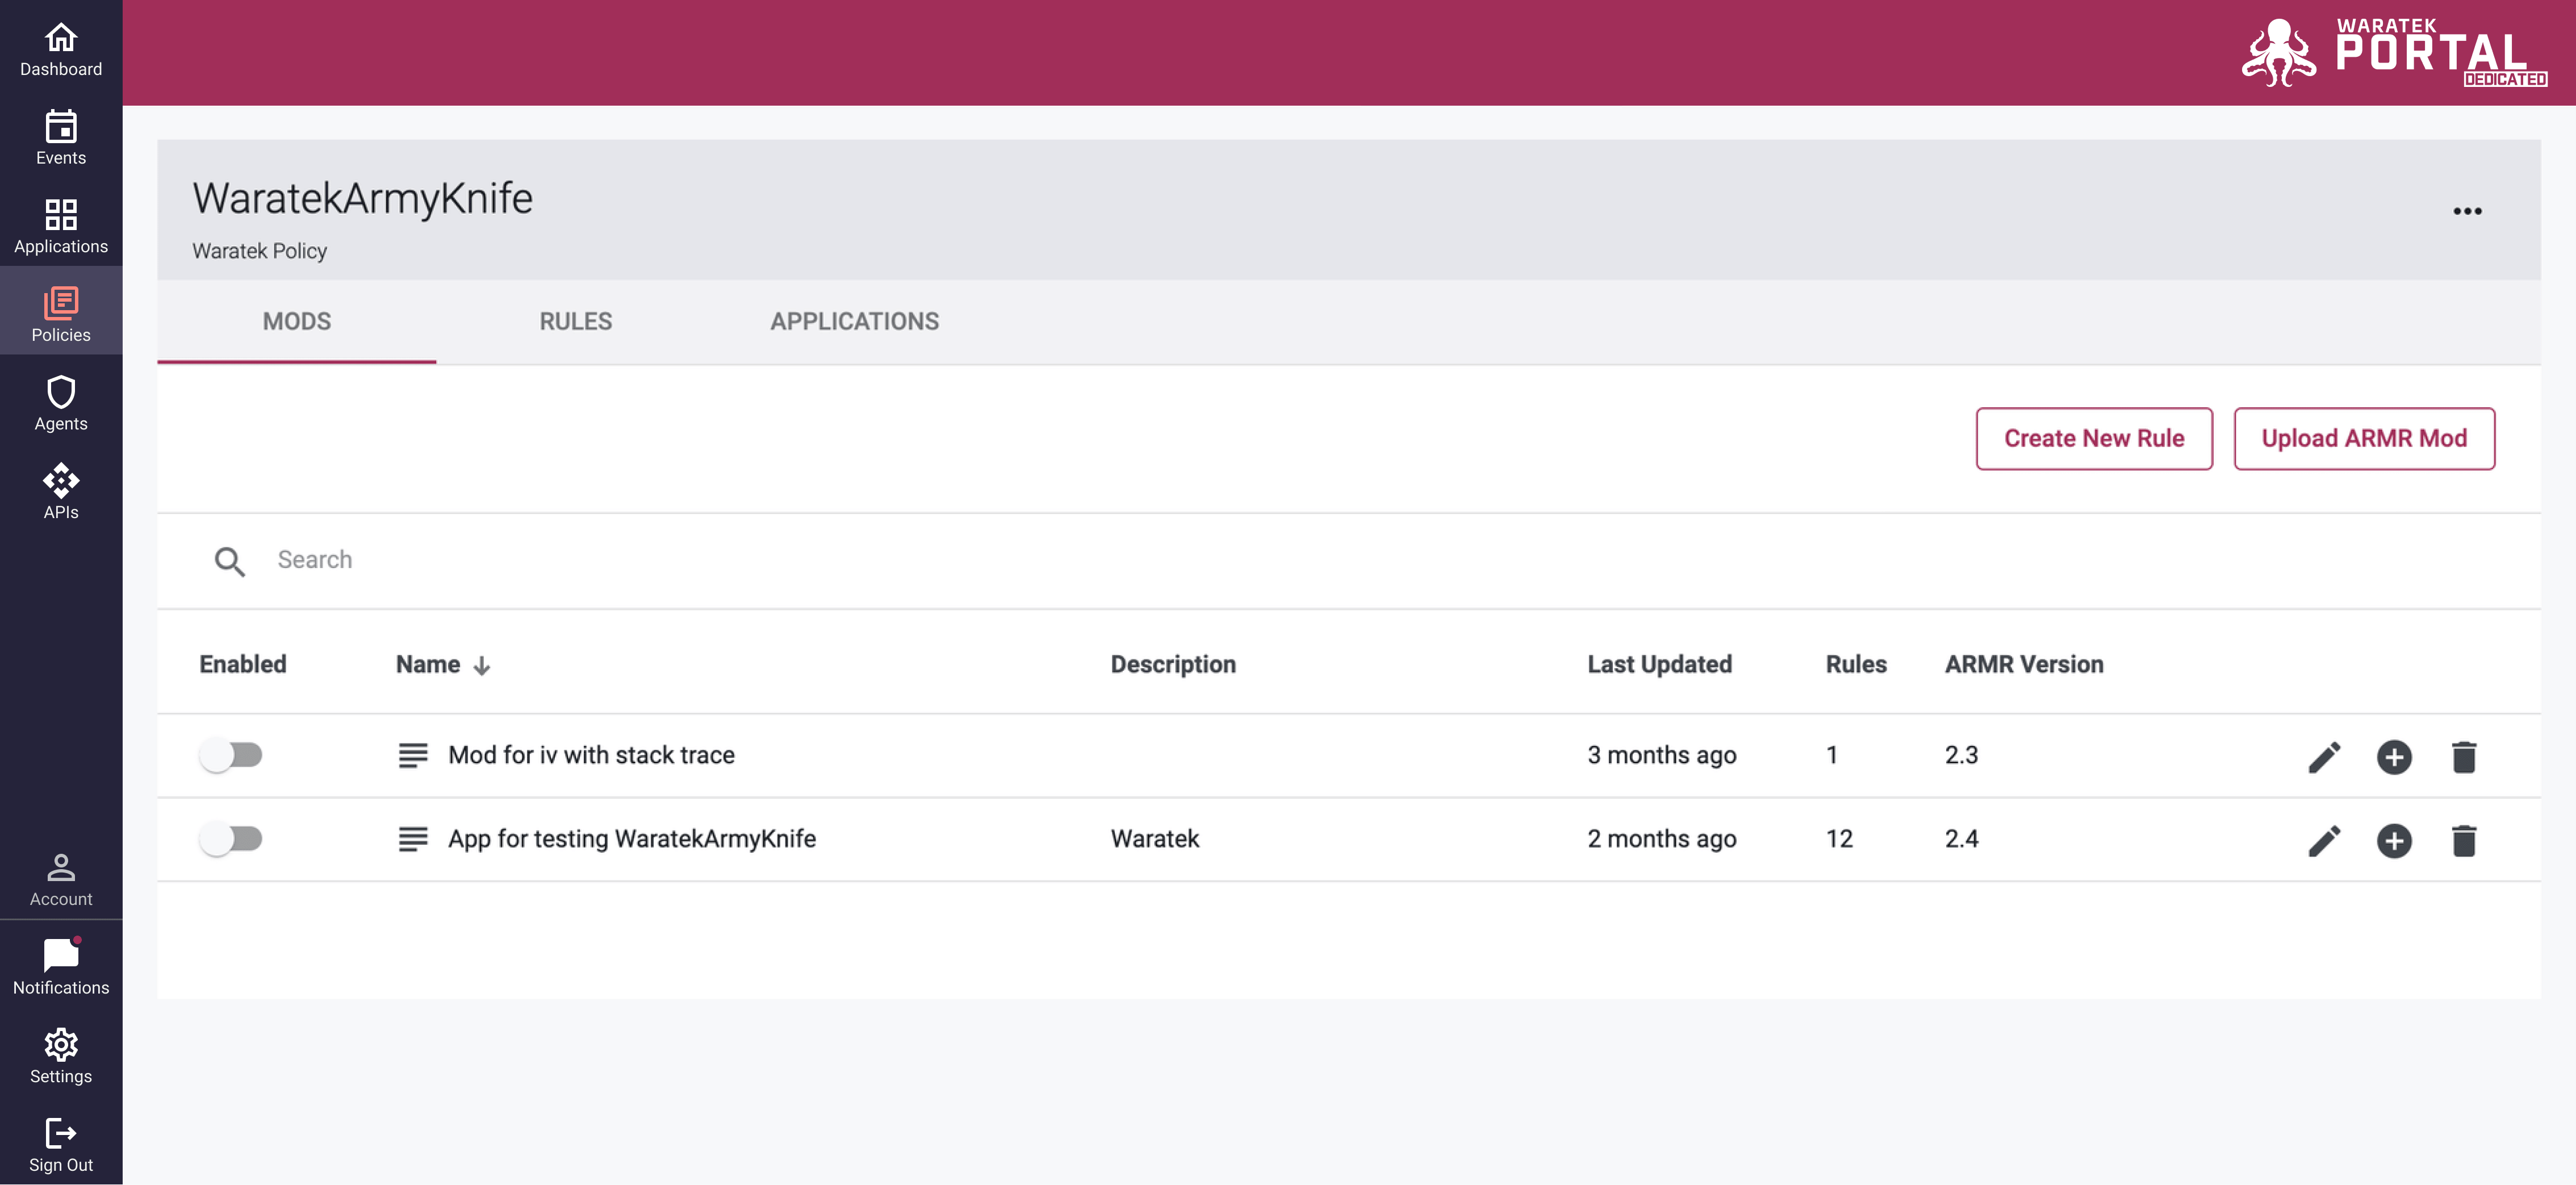
Mods View: This tabbed view displays all of the Mods contained within the policy. If you click on the icon  beside the name of any Mod you will be taken to the Mod Details view: a page that displays detailed information about the mod and all of the rules contained within that mod.
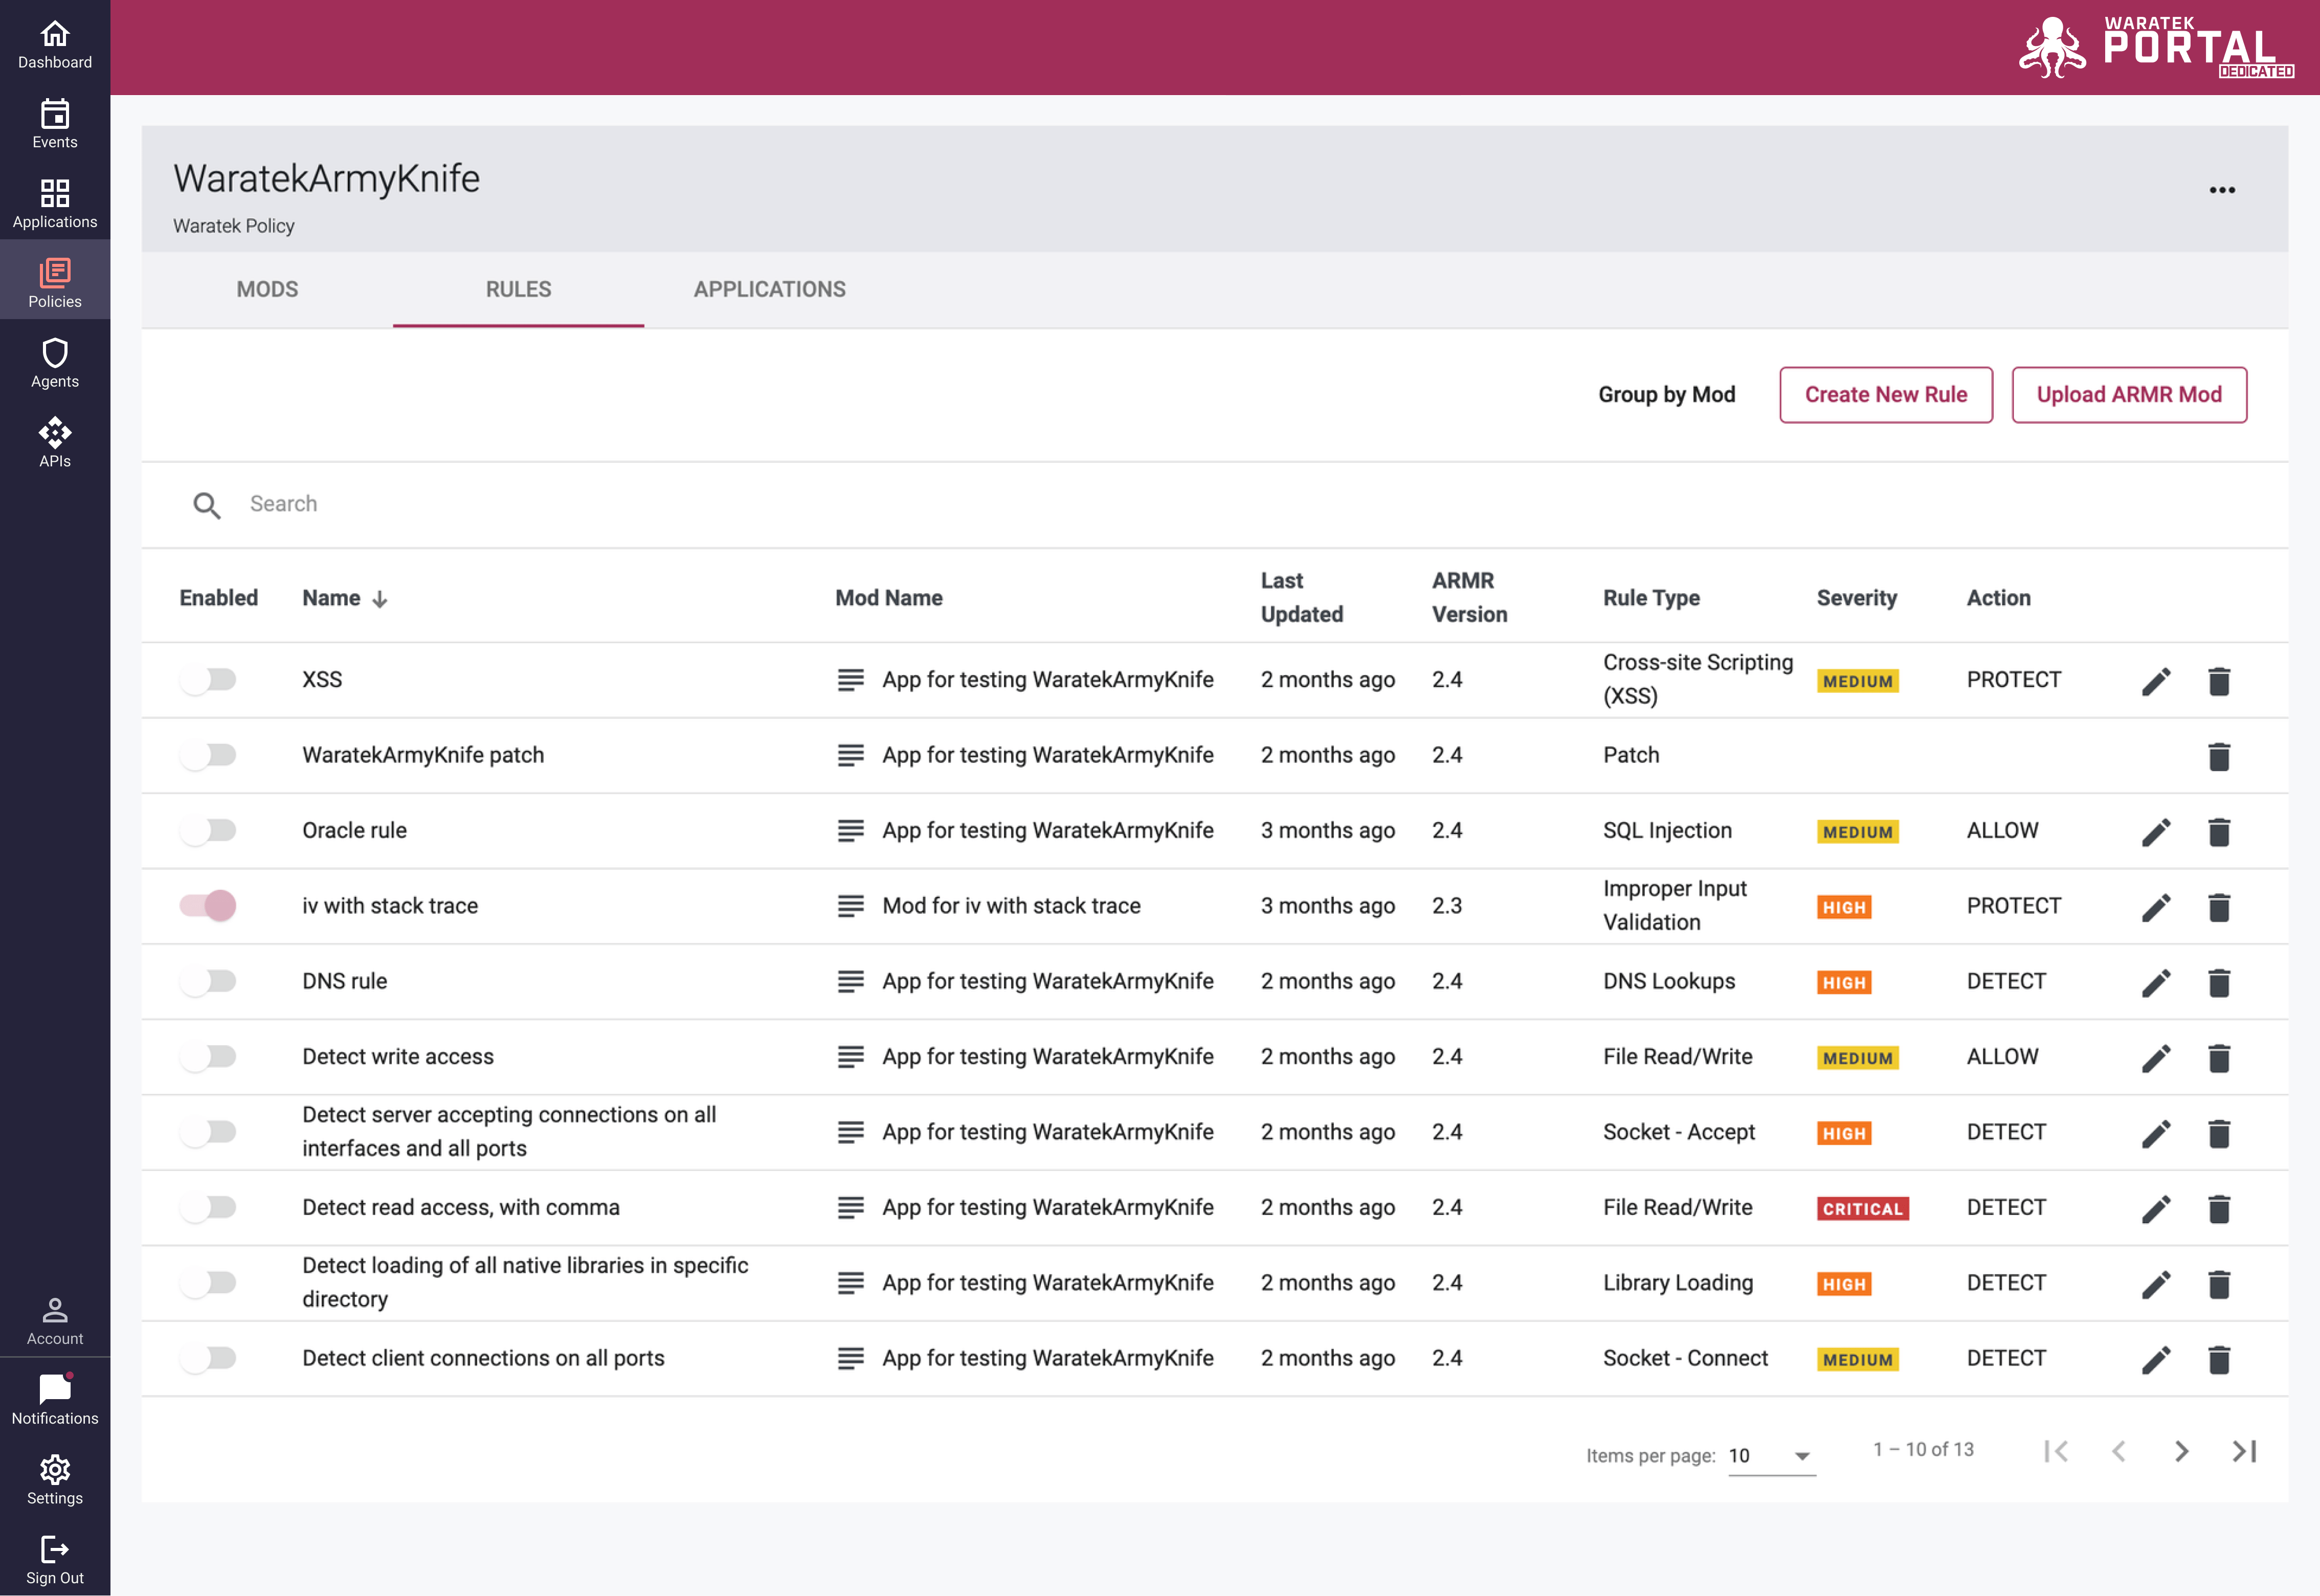
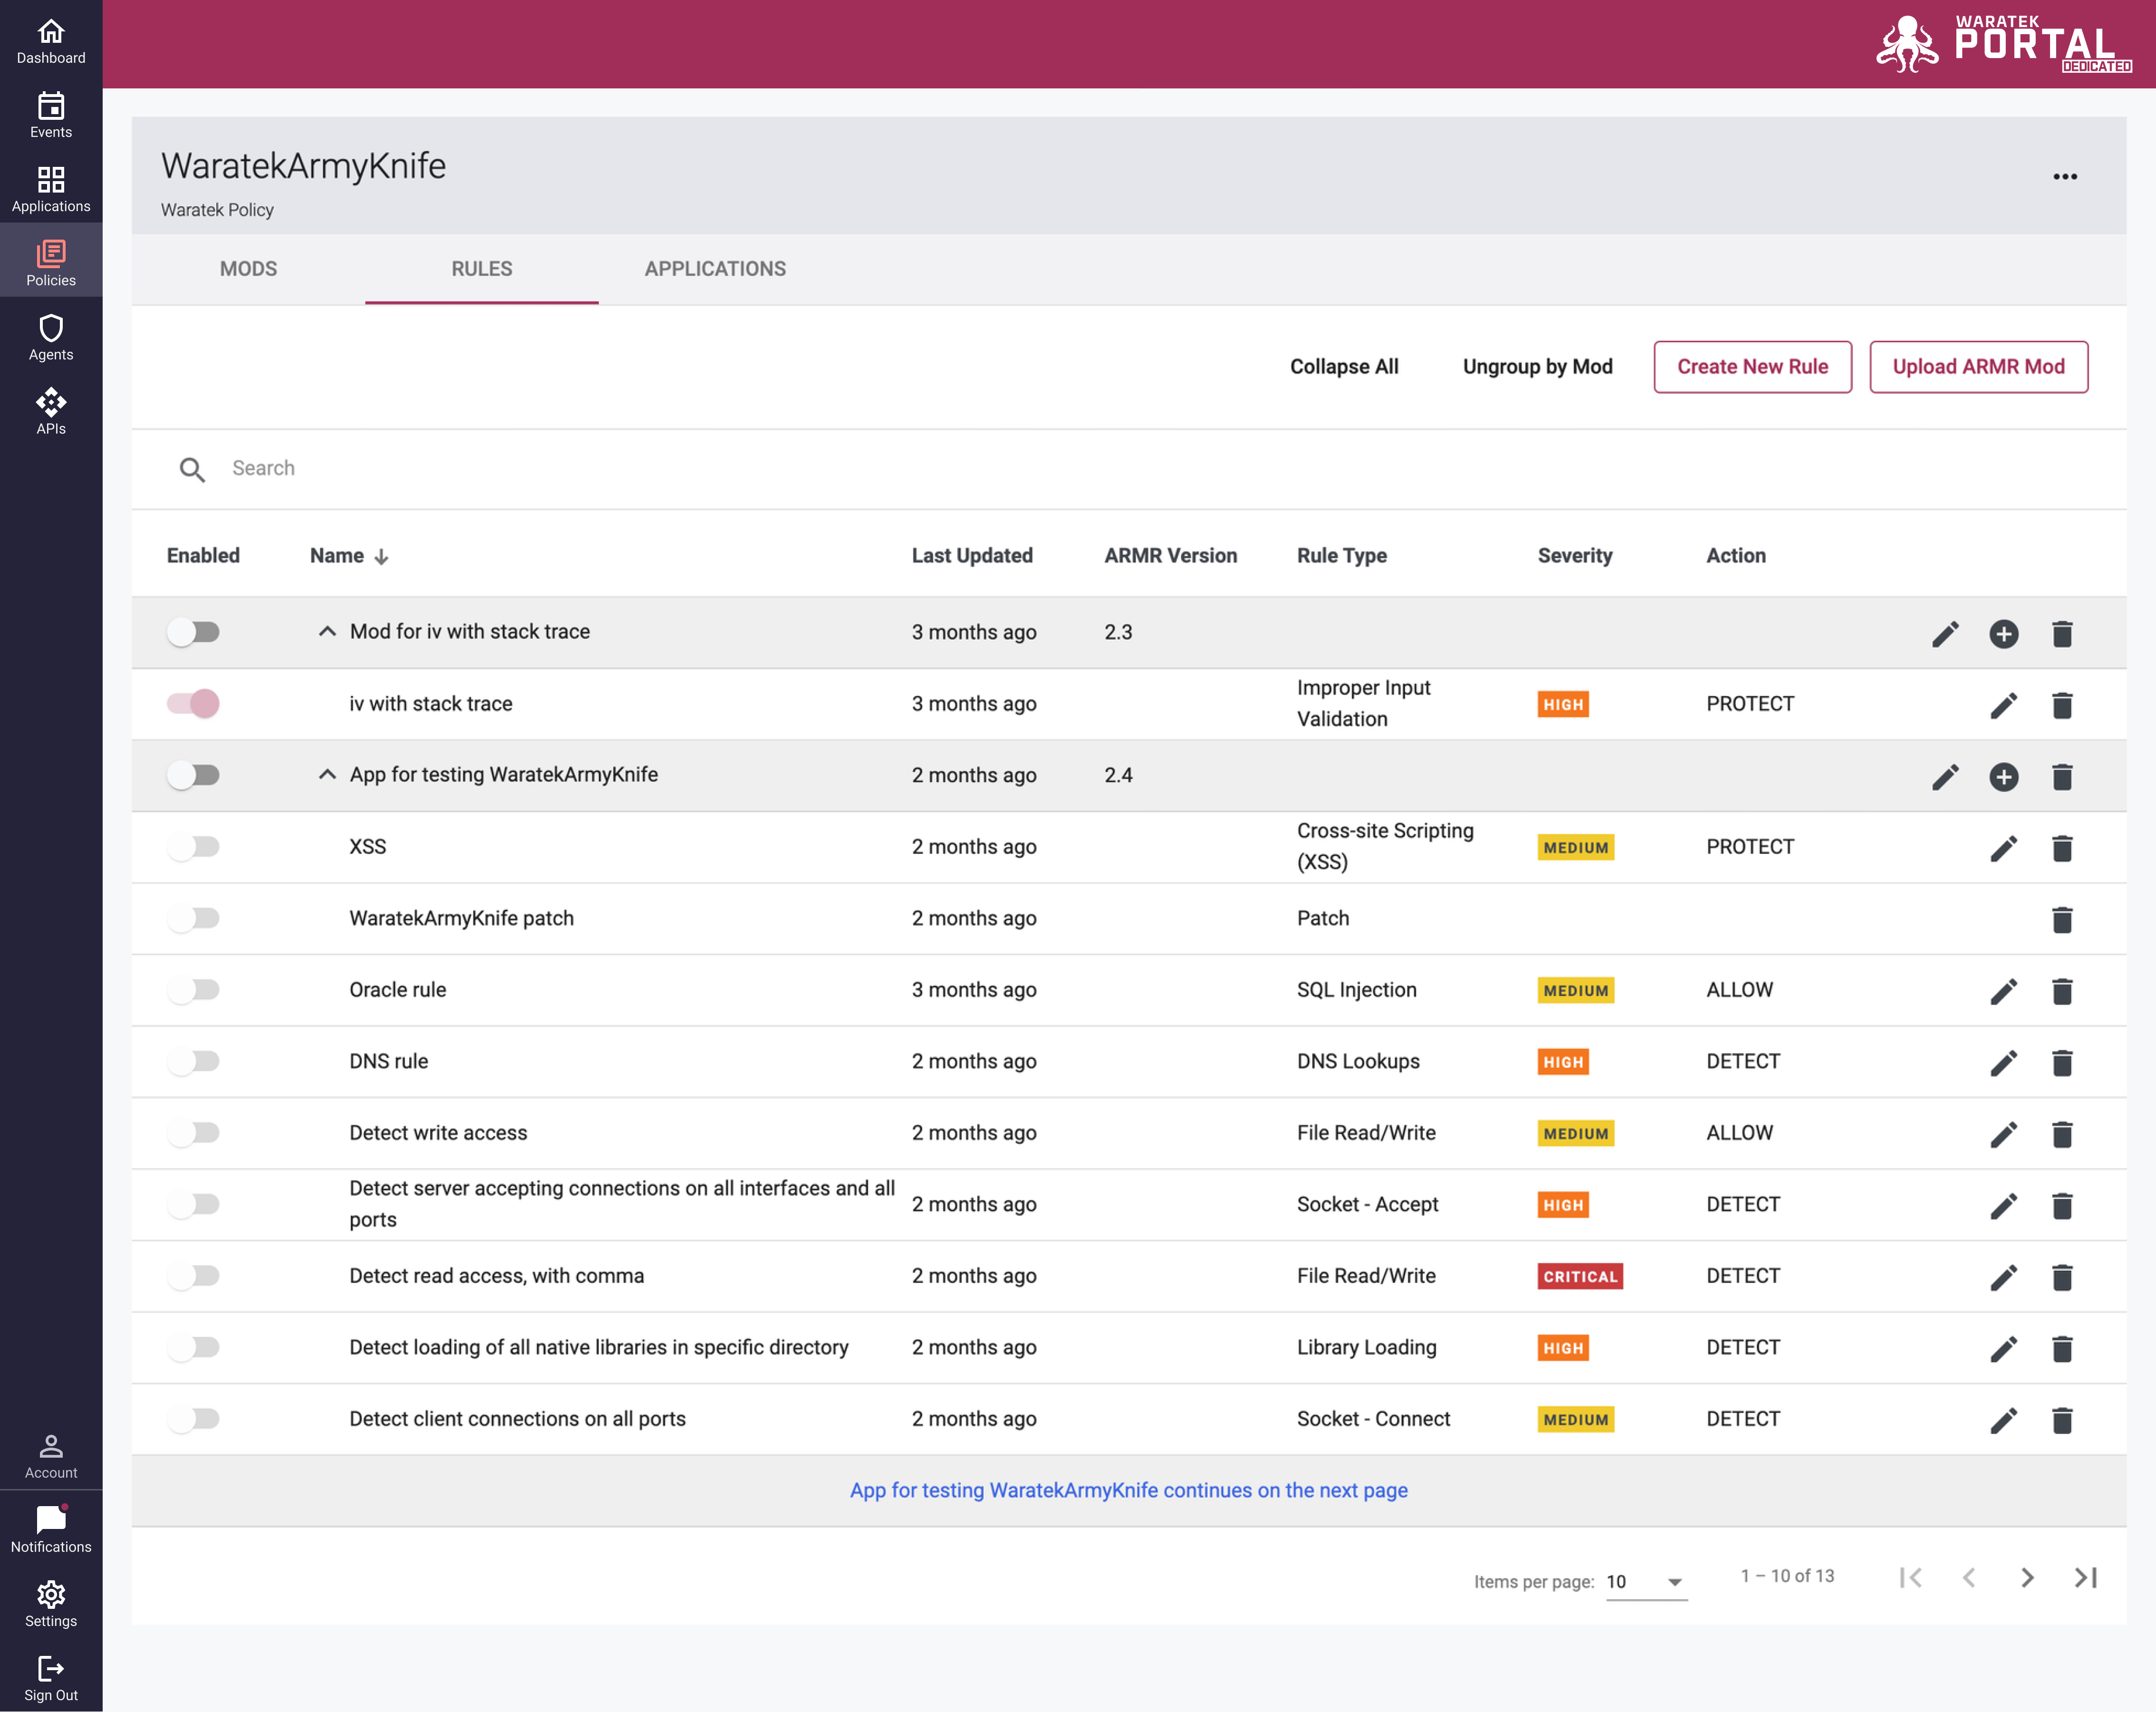
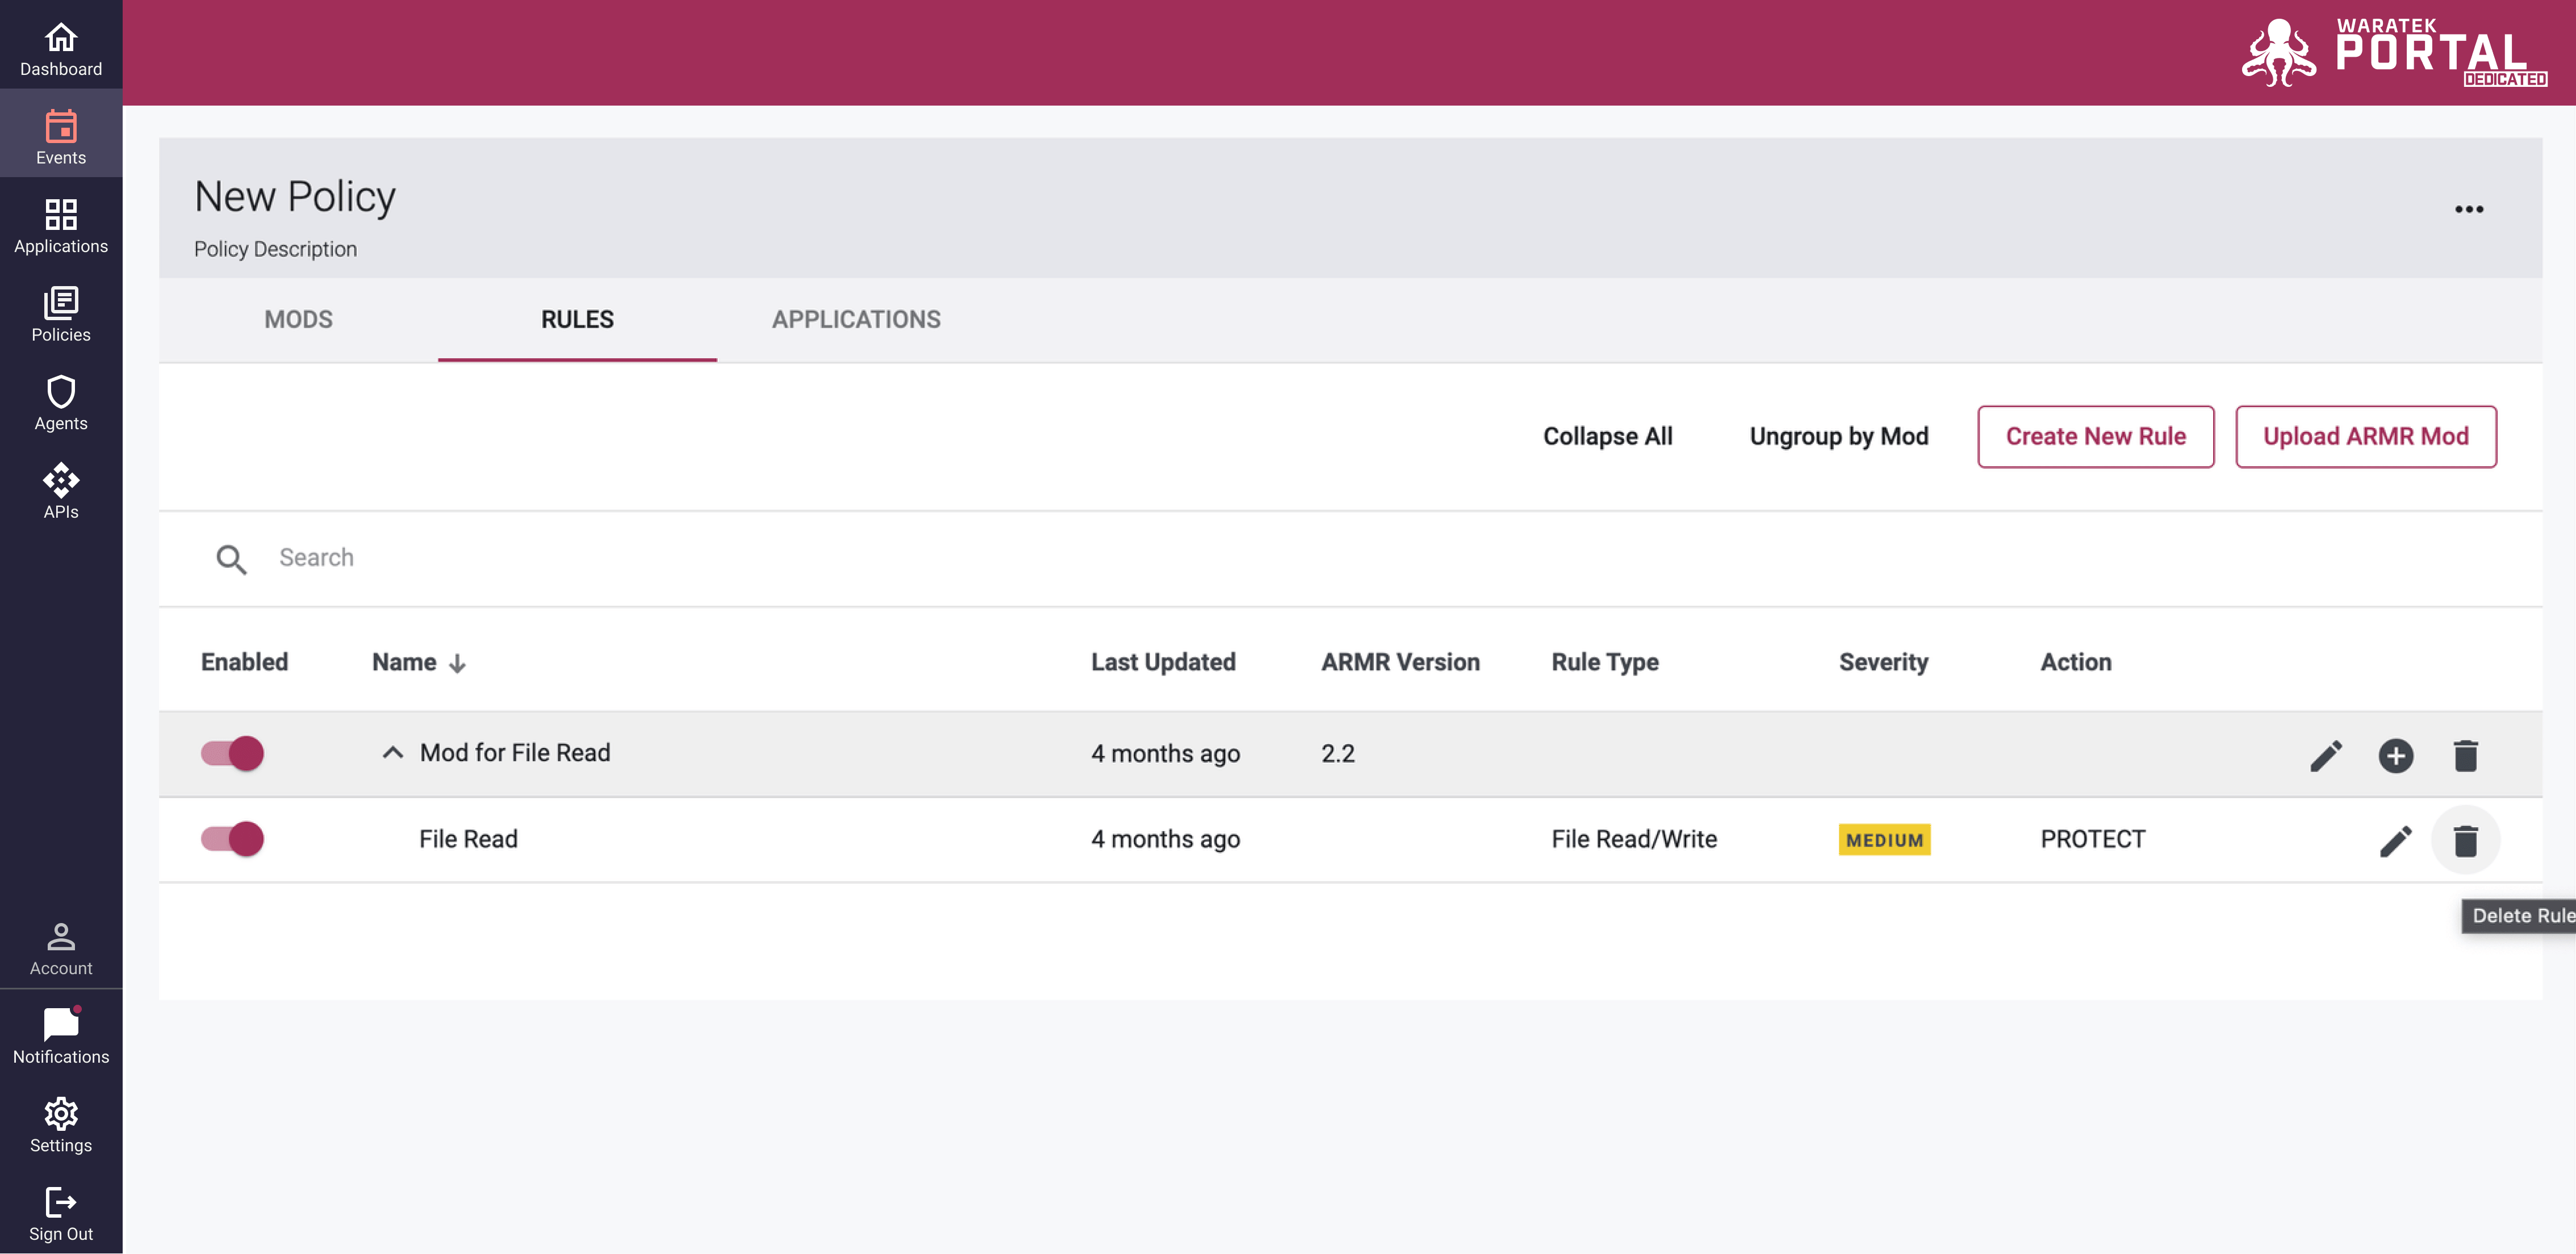
Rules View: This tab displays all of the Rules contained within the policy in a flat list. This allows you to see all the rules contained within a policy, together, on one page (pagination notwithstanding).
Rules View - Group By Mods: Selecting the Group by Mods button at the top of the Rules list will group the flat list of rules by mod. This is a hybrid view that allows you to see all of the rules listed within the Mods in which they are contained.
Policy Structure
Viewing Mods and Rules
To view the Mods contained within a policy, from the Policy Details page select the Mods tab. This will display a list of the Mods contained within the Policy along with additional information for each Mod such as when each was last updated, the ARMR version of the Mod, and the number of rules contained within each Mod.
To view the Rules contained within a policy, from the Policy Details page click on the Rules tab. This will display a flat list of all of the Rules contained within the Policy, along with additional information such as when each Rule was last updated, the name of its parent Mod, the Rule Type, the severity, and the Action for each rule.
To view the Rules grouped by their parent Mod, click on the Group By Mod button at the top right, just above the table. This will display the same flat rule list but each rule will be grouped by their parent Mod. A separator row containing the Mod name, when the Mod was last updated, and the Mods ARMR version will appear at the top of each group of rules.
Policies Page Actions:
- Create a New Policy
- Delete a Policy*
- Click on a Policy icon to be taken to the Policy Details page. Here you can view a list of all of the Mods contained within that policy and a list of the rules within that policy.
- Duplicate a Policy
- Edit a policy's details (name and description)
- View the contents of a Policy as a list of Mods, a list of Rules, or a list of rules grouped by Mod
Policy Details Page | Dropdown Menu Actions:
-
Edit the Policy Details
- Policy Name
- Policy Description
-
Export the Policy
-
Duplicate the Policy
-
Delete the Policy*
*Deleting a policy removes it from all Applications that it has been applied to and their Agents. Agents without rules will still start up and they will continue to poll the Portal for a new policy. However, they will provide no protection until a new policy has been applied and they will have a status of Rules Update Pending.
Policy Details Page | Mods Tab Actions:
-
Create new Rules within the Policy. This action creates a new mod containing the single rule that is being created.
-
Upload new Mods to the Policy
-
Enable and disable individual Mods within the Policy
-
Edit basic Mod Details
- Mod Name*
- Mod Description
- Update the ARMR version
-
Add a new rule to an existing Mod
-
Delete Mods**
-
Drilling down by clicking on any Mod icon
in the name, column to dive into the Mod details page. -
Changing the name of a Mod will break any references in the Events Database to the Mod as previously created events will be pointing to the old Mod name (which no longer exists). See the section Editing a Mod below for more details.
** Deleting a Mod removes it from the policy and removed the Mods' rules from every Agent to which that policy has been applied.
Policy Details Page | Rules Tab Actions:
-
Create new Rules within the Policy. This action creates a new mod containing the single rule that is being created.
-
Upload new Mods to the Policy
-
Enable and disable individual Rules within the Policy
-
Edit basic Rule Details:
- The Rule Name
- The Rule Description
-
Delete Rules
-
Edit and View Rules. Clicking on the Edit icon
 will launch the Rule Wizard for viewing and editing Rules
Policy Details Page | Rules Tab - Group by Mod Actions:
- Enable and disable individual Mods within the Policy
- Upload new Mods to the Policy
- Edit Mod Details
- Delete Mod
- Add new Rule to Mod
- Enable and disable individual Rules within the Policy
- Create new rules within the Policy. This action creates a new mod containing the single rule that is being created.
- Edit basic Rule Details (name, description)
- Delete Rules
- Edit and View Rules (via the Rule Wizard). Clicking on the Edit icon will launch the Rule Wizard for viewing and editing Rules
Mod Details Page Actions:
-
Edit the Mod Details*:
- The Mod Name
- The Mod Description
- Change the Mod Version
-
Enable and disable individual rules within the Mod
-
Delete Rules from the Mod**
-
Add new rules to the Mod
-
Edit the rules contained within the Mod
-
Delete the Mod***
-
Changing the name of a Mod will break any references in the Events Database to the Mod as previously created events will be pointing to the old Mod name (which no longer exists). See the section Editing a Mod below for more details.
** Deleting a Rule removes it from the Mod and hence the Policy. The Agents to which that Policy has been applied will no longer be running that Rule.
*** Deleting a Mod removes it from the Policy, and the Agents to which that Policy has been applied; thus removing any protections provided by that Mod and its Rules.
Creating Policies and Rules
Within the Policies Page of the Portal you can:
- create a Policy from scratch
- create new Rules (which are automatically wrapped in a new Mod) to a Policy
- add new Rules to an existing Mod
- upload entire Policies to the Portal
- upload Mods to existing Policies.
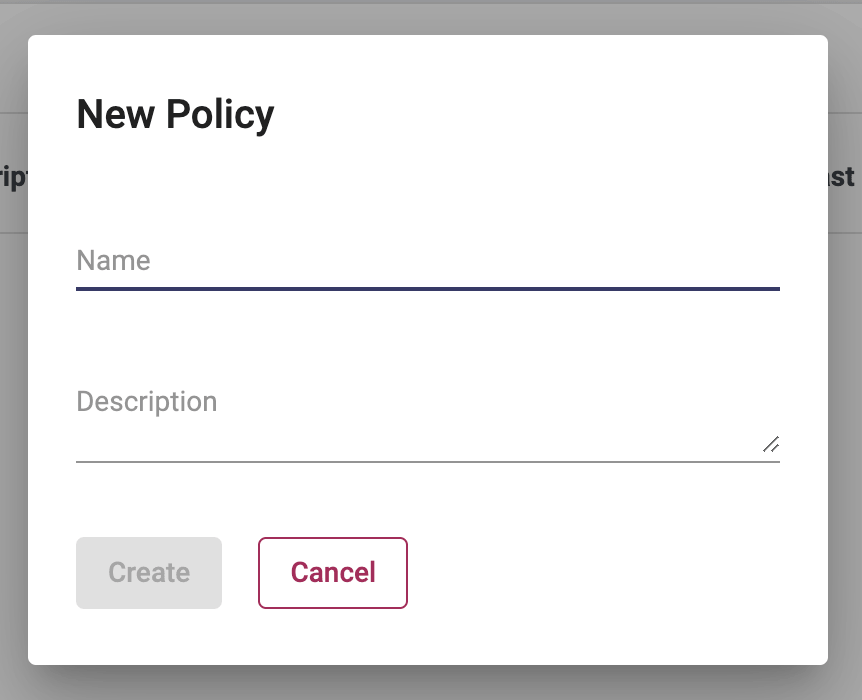
Creating a Policy
To create a new policy on the Policies Page, click on the New Policy button at the top right of the Policy screen and complete the New Policy modal that appears. Once this is completed, the new Policy Details page loads where you can add Mods and Rules.
The New Policy dialog may include a Team selection option if there are Teams in the system, see Settings → Teams for more details
Creating Rules and Mods within a Policy
Rules and mods can be uploaded or created within any policy. To add a rule from scratch (which will automatically create a containing Mod by default) click on the Create New Rule button; a pop-up modal (the Rule Wizard) will appear allowing you to select a rule type and create rules. More information on Rule Types and the Rule Wizard is provided in the User Guide's Rules Wizard section.
As all rules must be contained within a Mod, when creating a rule via the wizard, a containing Mod is automatically created with the rule and it will be named “Mod for <rule name>.” If the Rule name is “Test123” then the Mod name will be “Mod for Test123.”
Accommodating different ARMR versions within a Policy
The ARMR language has evolved over time. As a result, not all Agents are compatible with all ARMR versions. It is also important to remember that not all users will update all Agents at once which means that Applications can contain Agents of differing revisions that need to be supported by a single policy. A policy can contain several Mods and Rules across multiple versions of ARMR as well. For example, a policy may contain a Mod for ARMR v2.4 and another Mod that supports ARMR v2.2. This allows you to create a policy that supports a non-heterogenous Agent environment.
ARMR versions are dictated not by individual rules but by the Mods that they are contained within. When adding a new rule to an existing Mod the Rule Wizard will automatically apply that Mod's ARMR version. For example, if the current ARMR version is 2.4 and you add a rule to a Mod with ARMR v2.2 then the Rule Wizard will create the new rule using ARMR v2.2 only.
While Mods may be upgraded to higher versions (like upgrading an ARMR 2.3 Mod to a 2.4 Mod), the reverse cannot be done.
Creating Rules within a Mod
It is possible to create a rule within a Mod that already exists. To do this, you must open up the Policy Details and click on the Policy icon in the name column which will take you to the Mod Details page.
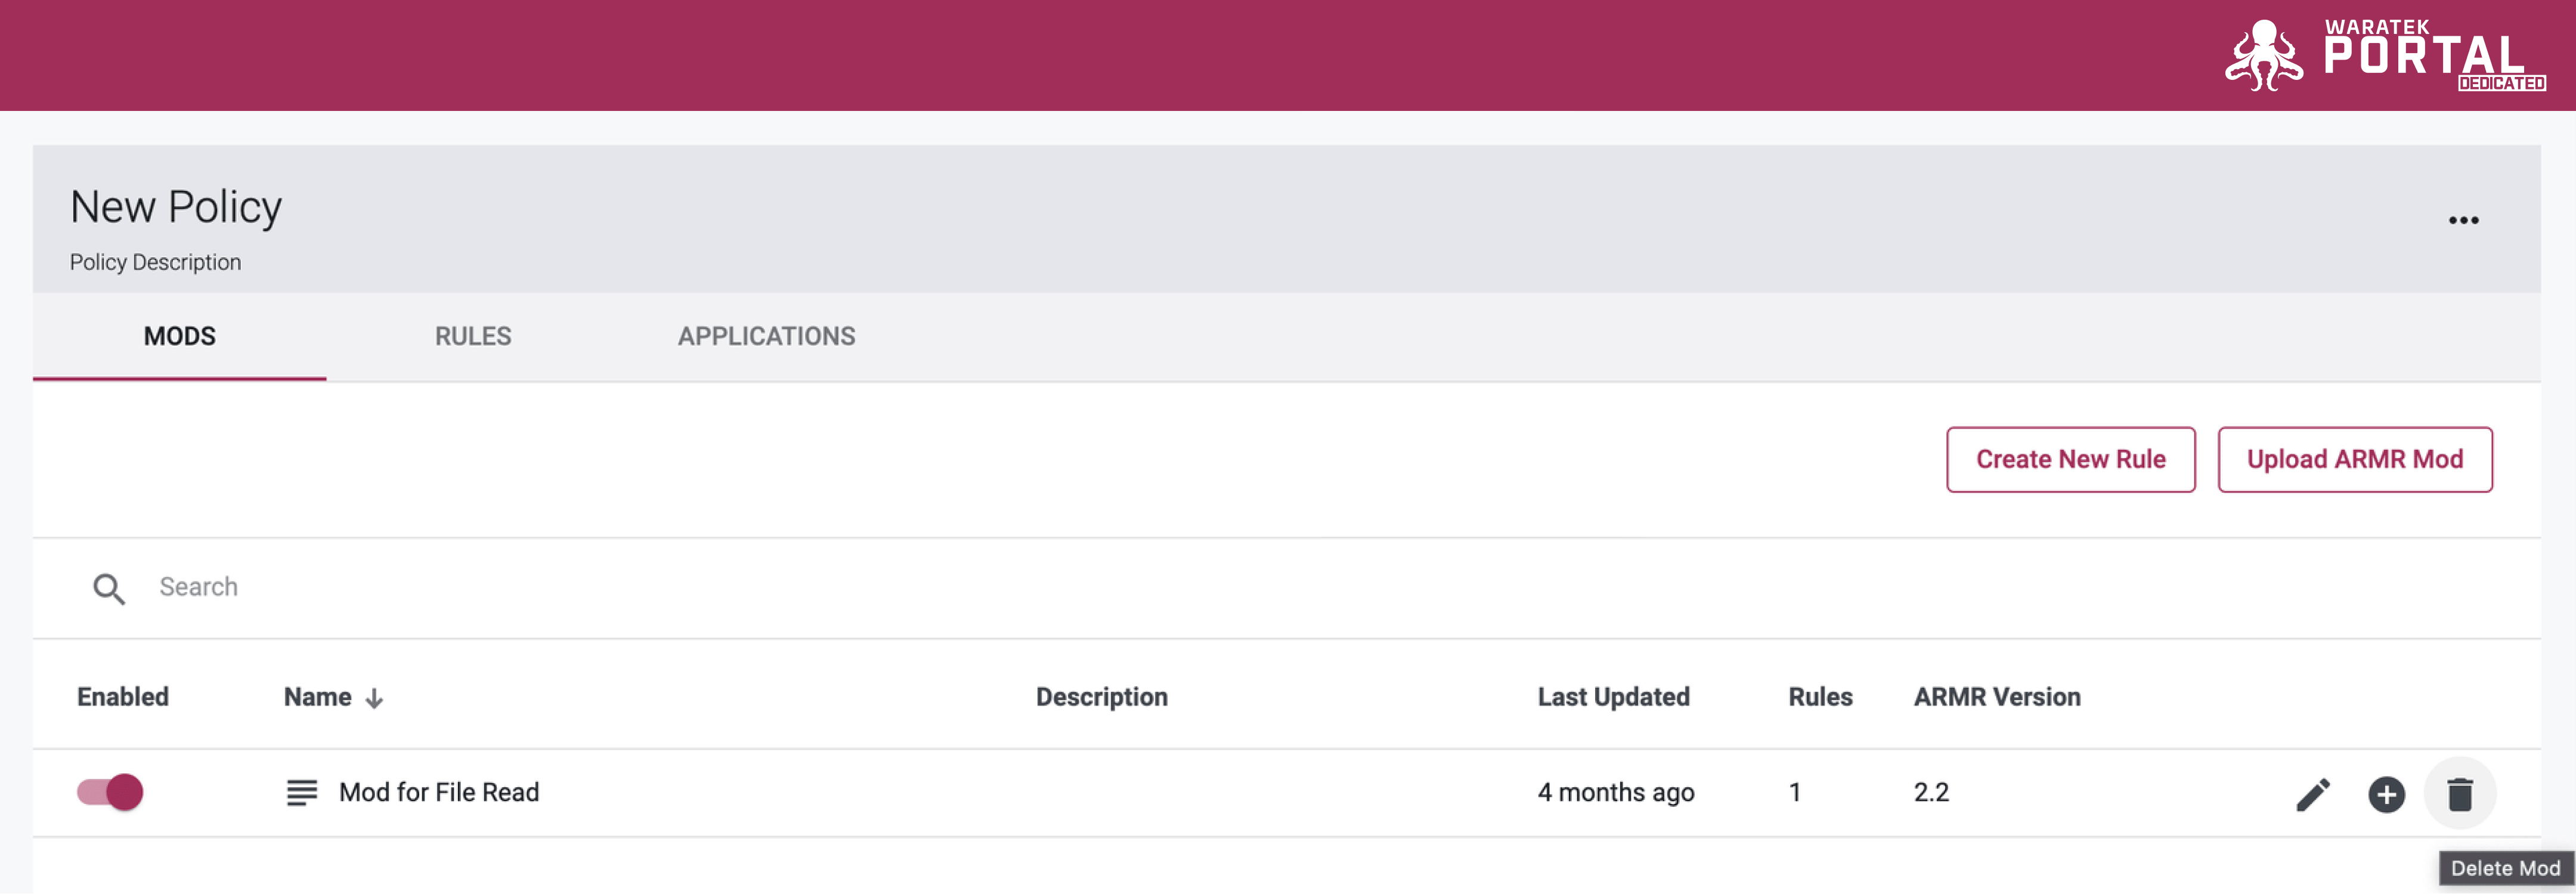
In the example below, the Policy Details page displays the “Mod for File Read” within the policy “New Policy.”
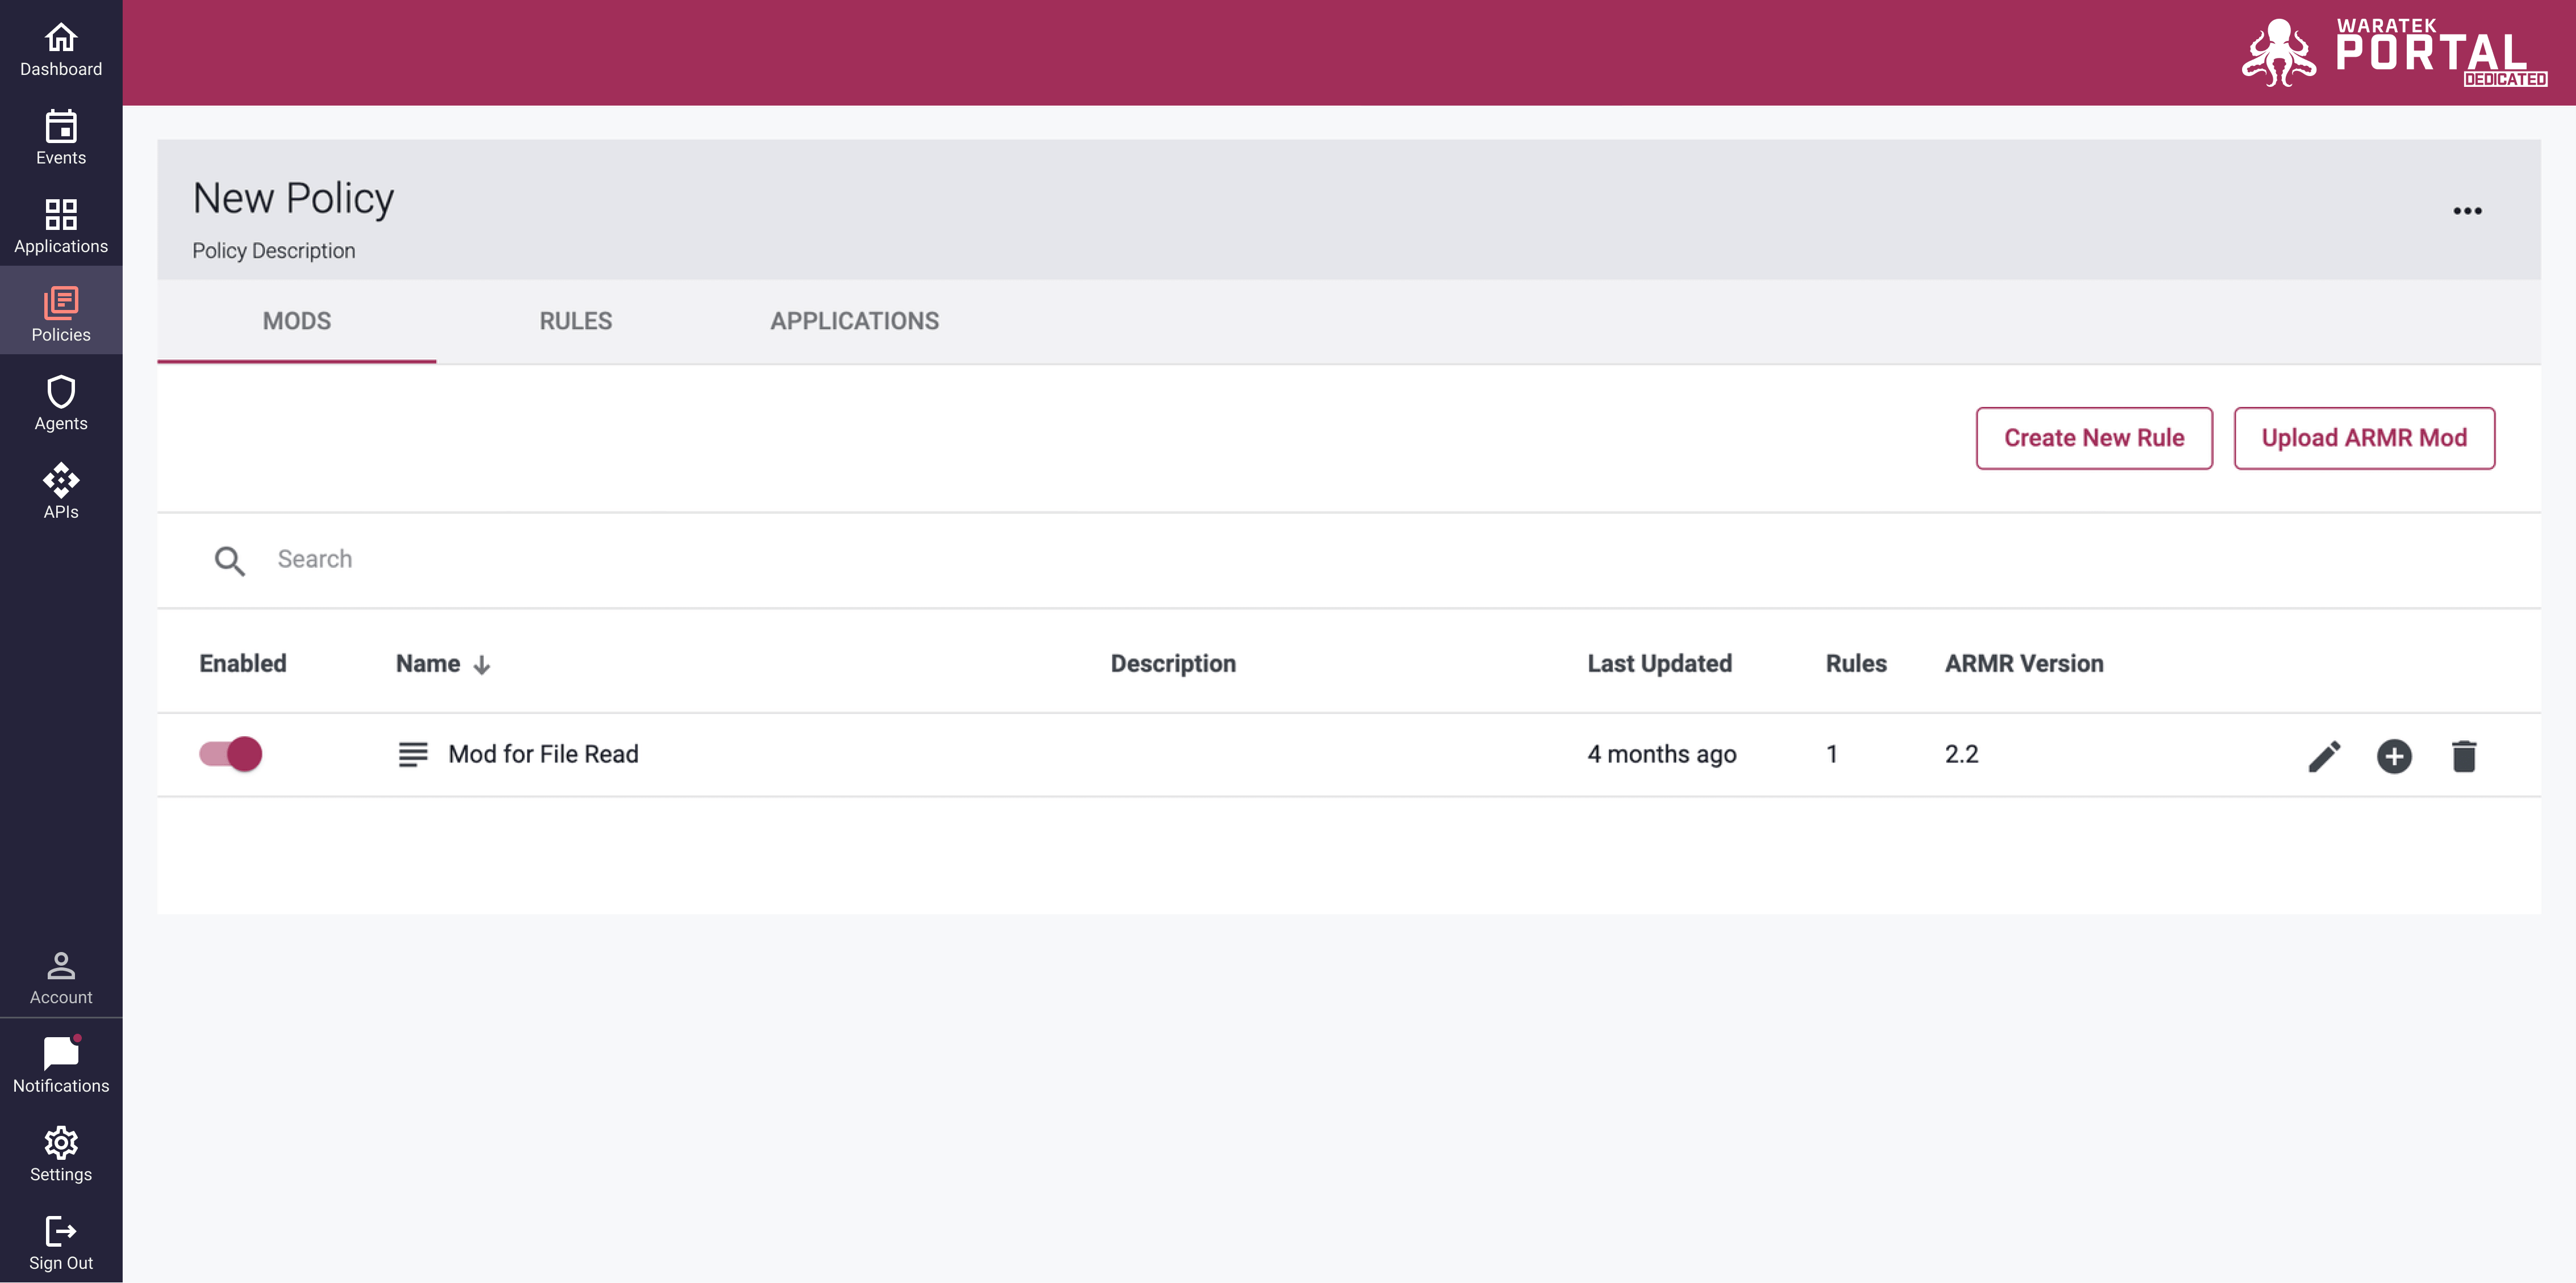
After clicking on the icon for “Mod for File Read” you will be taken to the Mod Details page, where you can see all the rules within the mod and can add a new rule to the Mod using the dropdown menu shown:
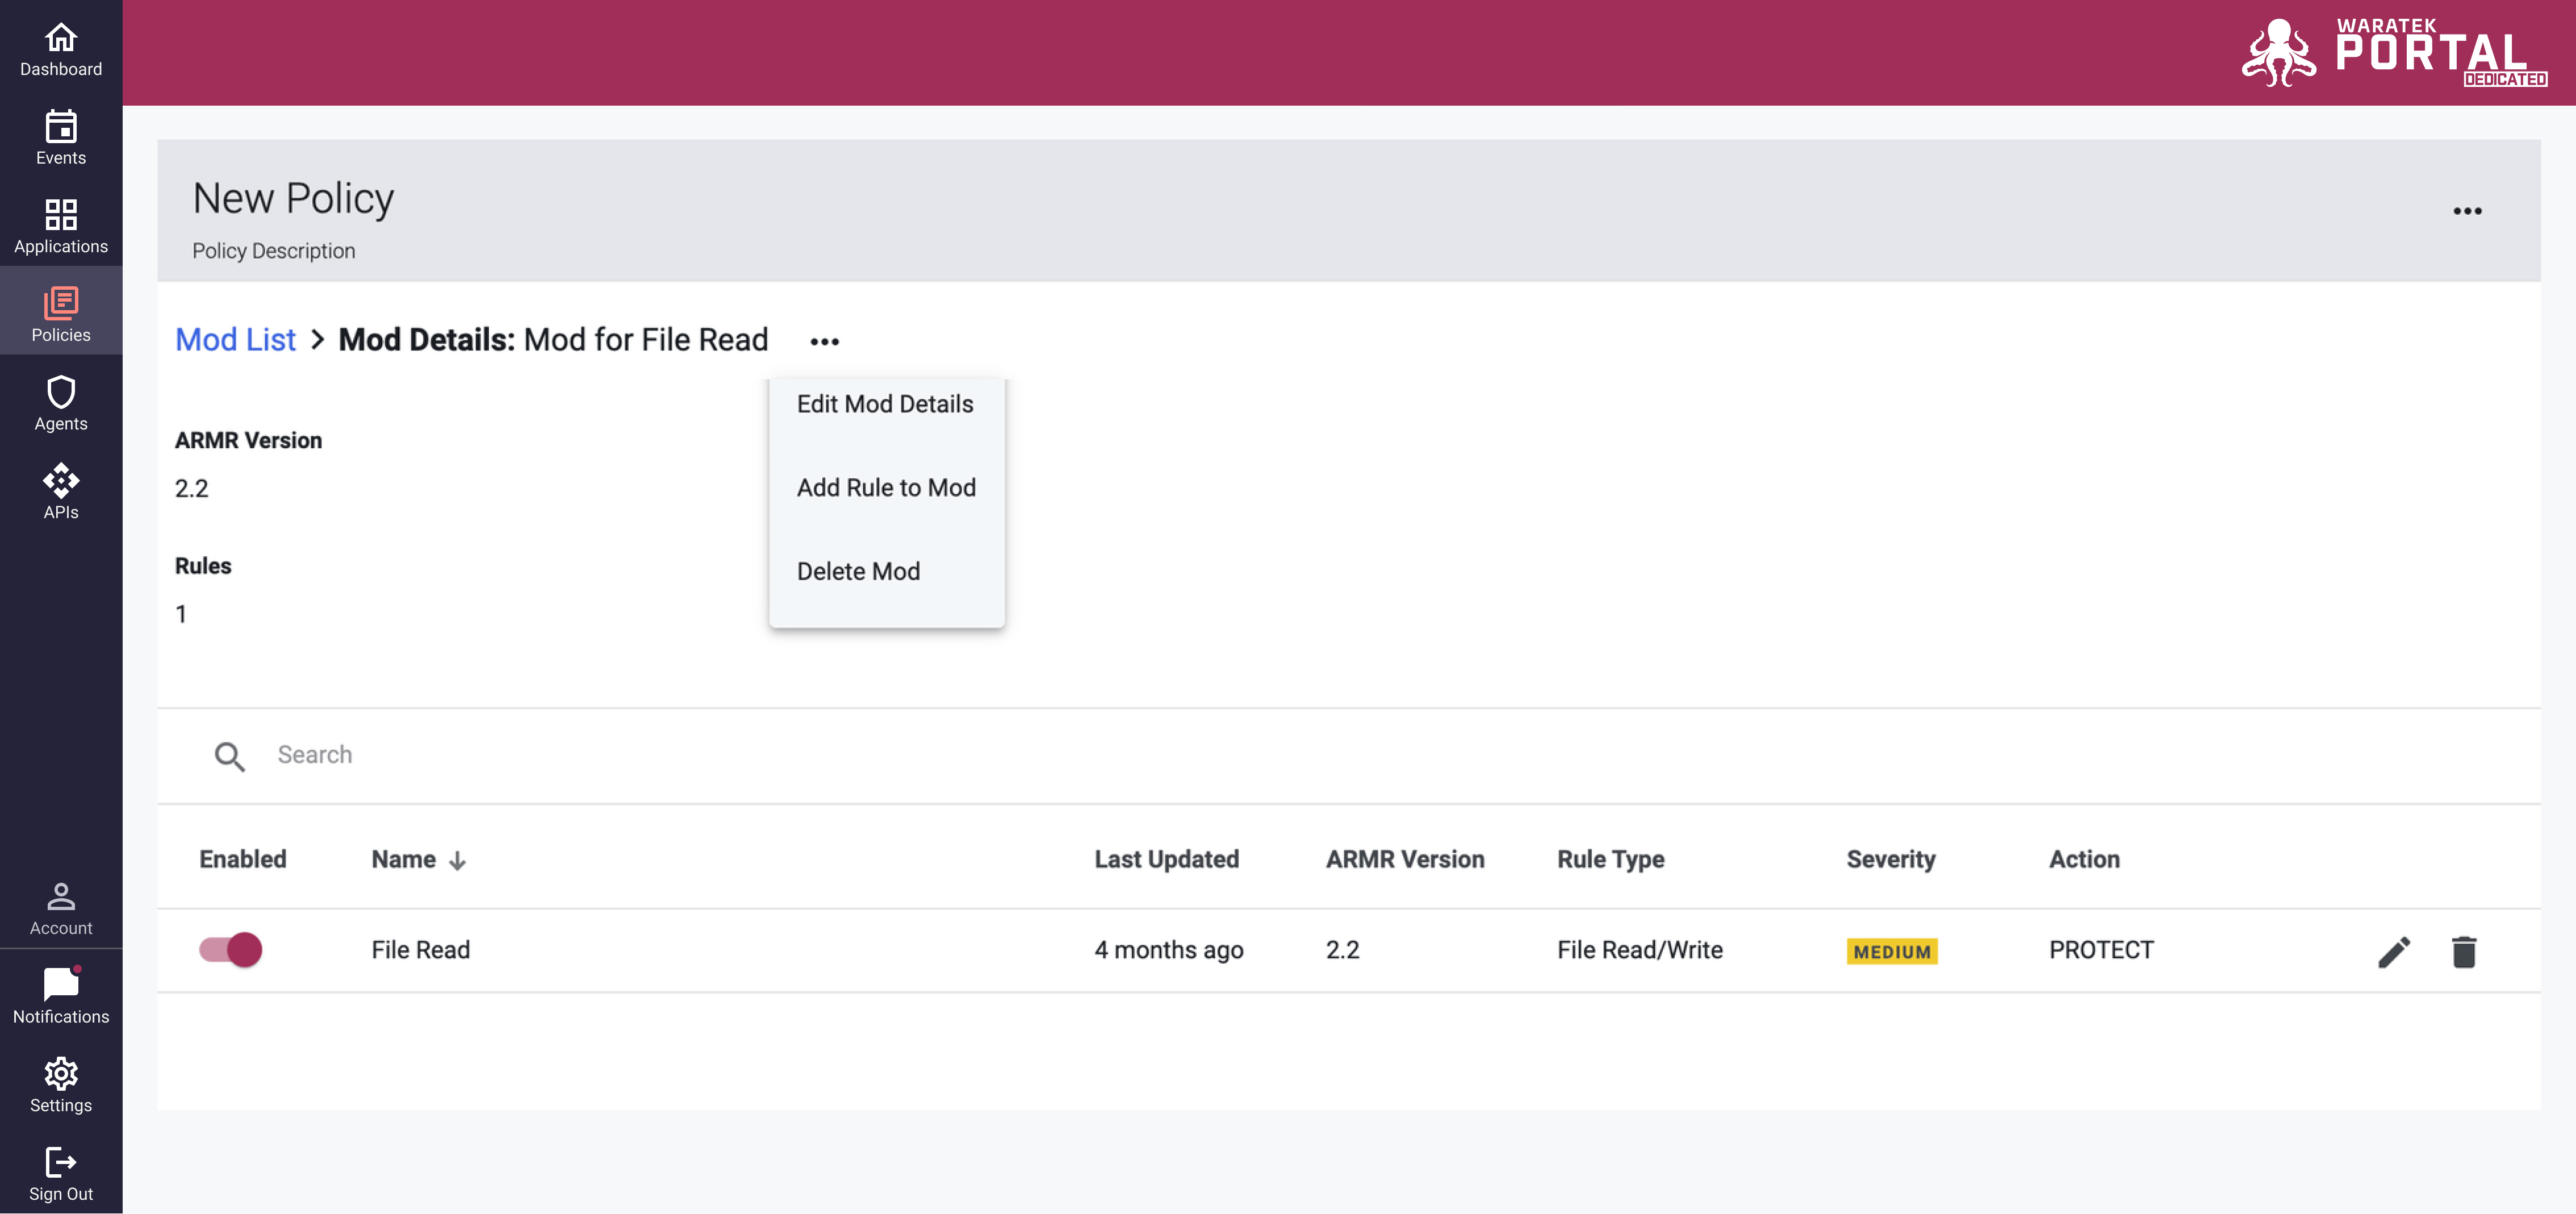
Next, you must select the Add Rule to Mod option from the menu and the Rule Wizard will popup, allowing you to create a new rule within this Mod.
Mods in the form of .armr files may also be uploaded to the policy. To do this, you can click on the Upload ARMR Mod button on the Policy Details page. A pop-up modal will appear which allows you to upload one or more .armr files from your local hard drive.
Once an ARMR Mod is uploaded to a policy it becomes part of that self-contained policy. If the same mod is uploaded to multiple policies and edited within one of the policies, those edits only apply to that single mod. The original copies of the mod uploaded to other policies are not affected.
Uploading Mods to a Policy
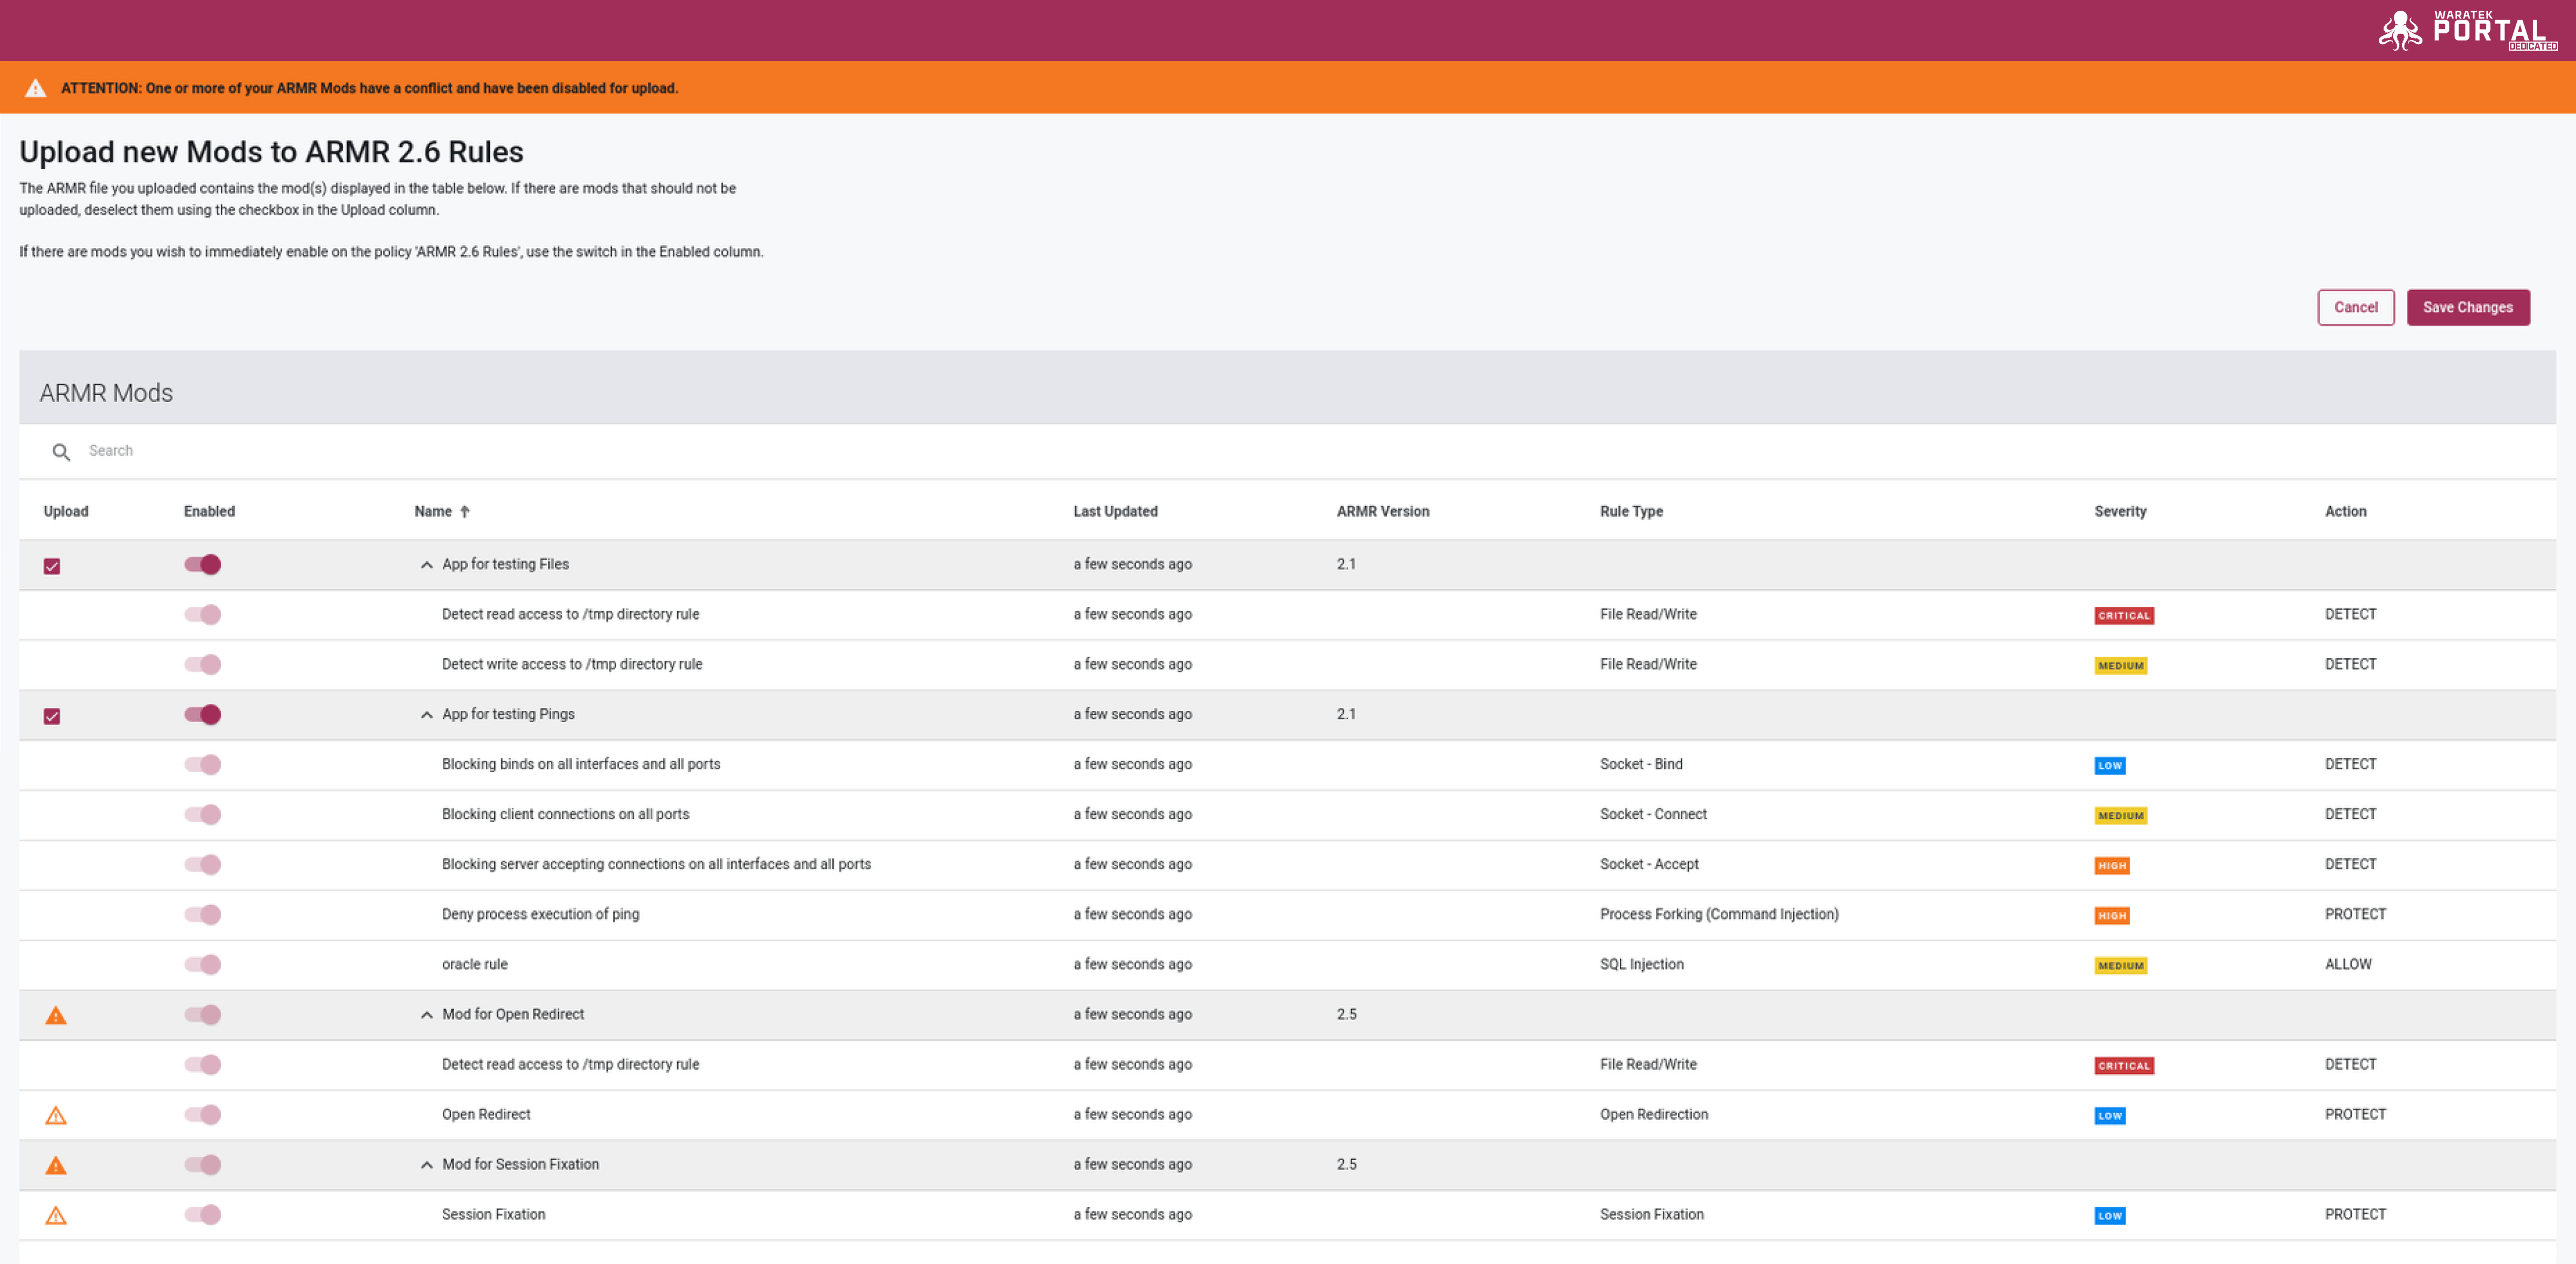
ARMR files can be uploaded within a Policy using the Upload ARMR Mod button at the top of the Policy table. When you drag and drop your files into the upload modal, the screen will update with a list of the Mods and Rules for upload. If there are any Mods for upload that conflicts with existing Mods, you will be notified here with an orange warning banner at the top of the page, and all affected Mods and Rules will be flagged with a warning icon. You can check the Mods you wish to upload and select Save Changes to complete the upload. Any Mods with conflicts are disabled for upload automatically.
Displaying ARMR Metadata
This feature is only available for rules written in ARMR v2.6 or higher
When a rule has been created or uploaded with metadata, you can view this data on the Portal by selecting the label icon  on the rule or mod row within the Policies page. Clicking on this icon will open a side panel with the rule or mod's metadata available in a read only format.

Deleting Policies and Rules
Delete a rule
A rule can be deleted under the Rules Tab on a Policy Details page or on the Mod Details page. To delete a rule, click on the Delete icon  in the rule's row on the screen.
If you delete the last rule within a Mod, you are also deleting the Mod itself. A confirmation modal will appear to confirm this action before you can proceed.
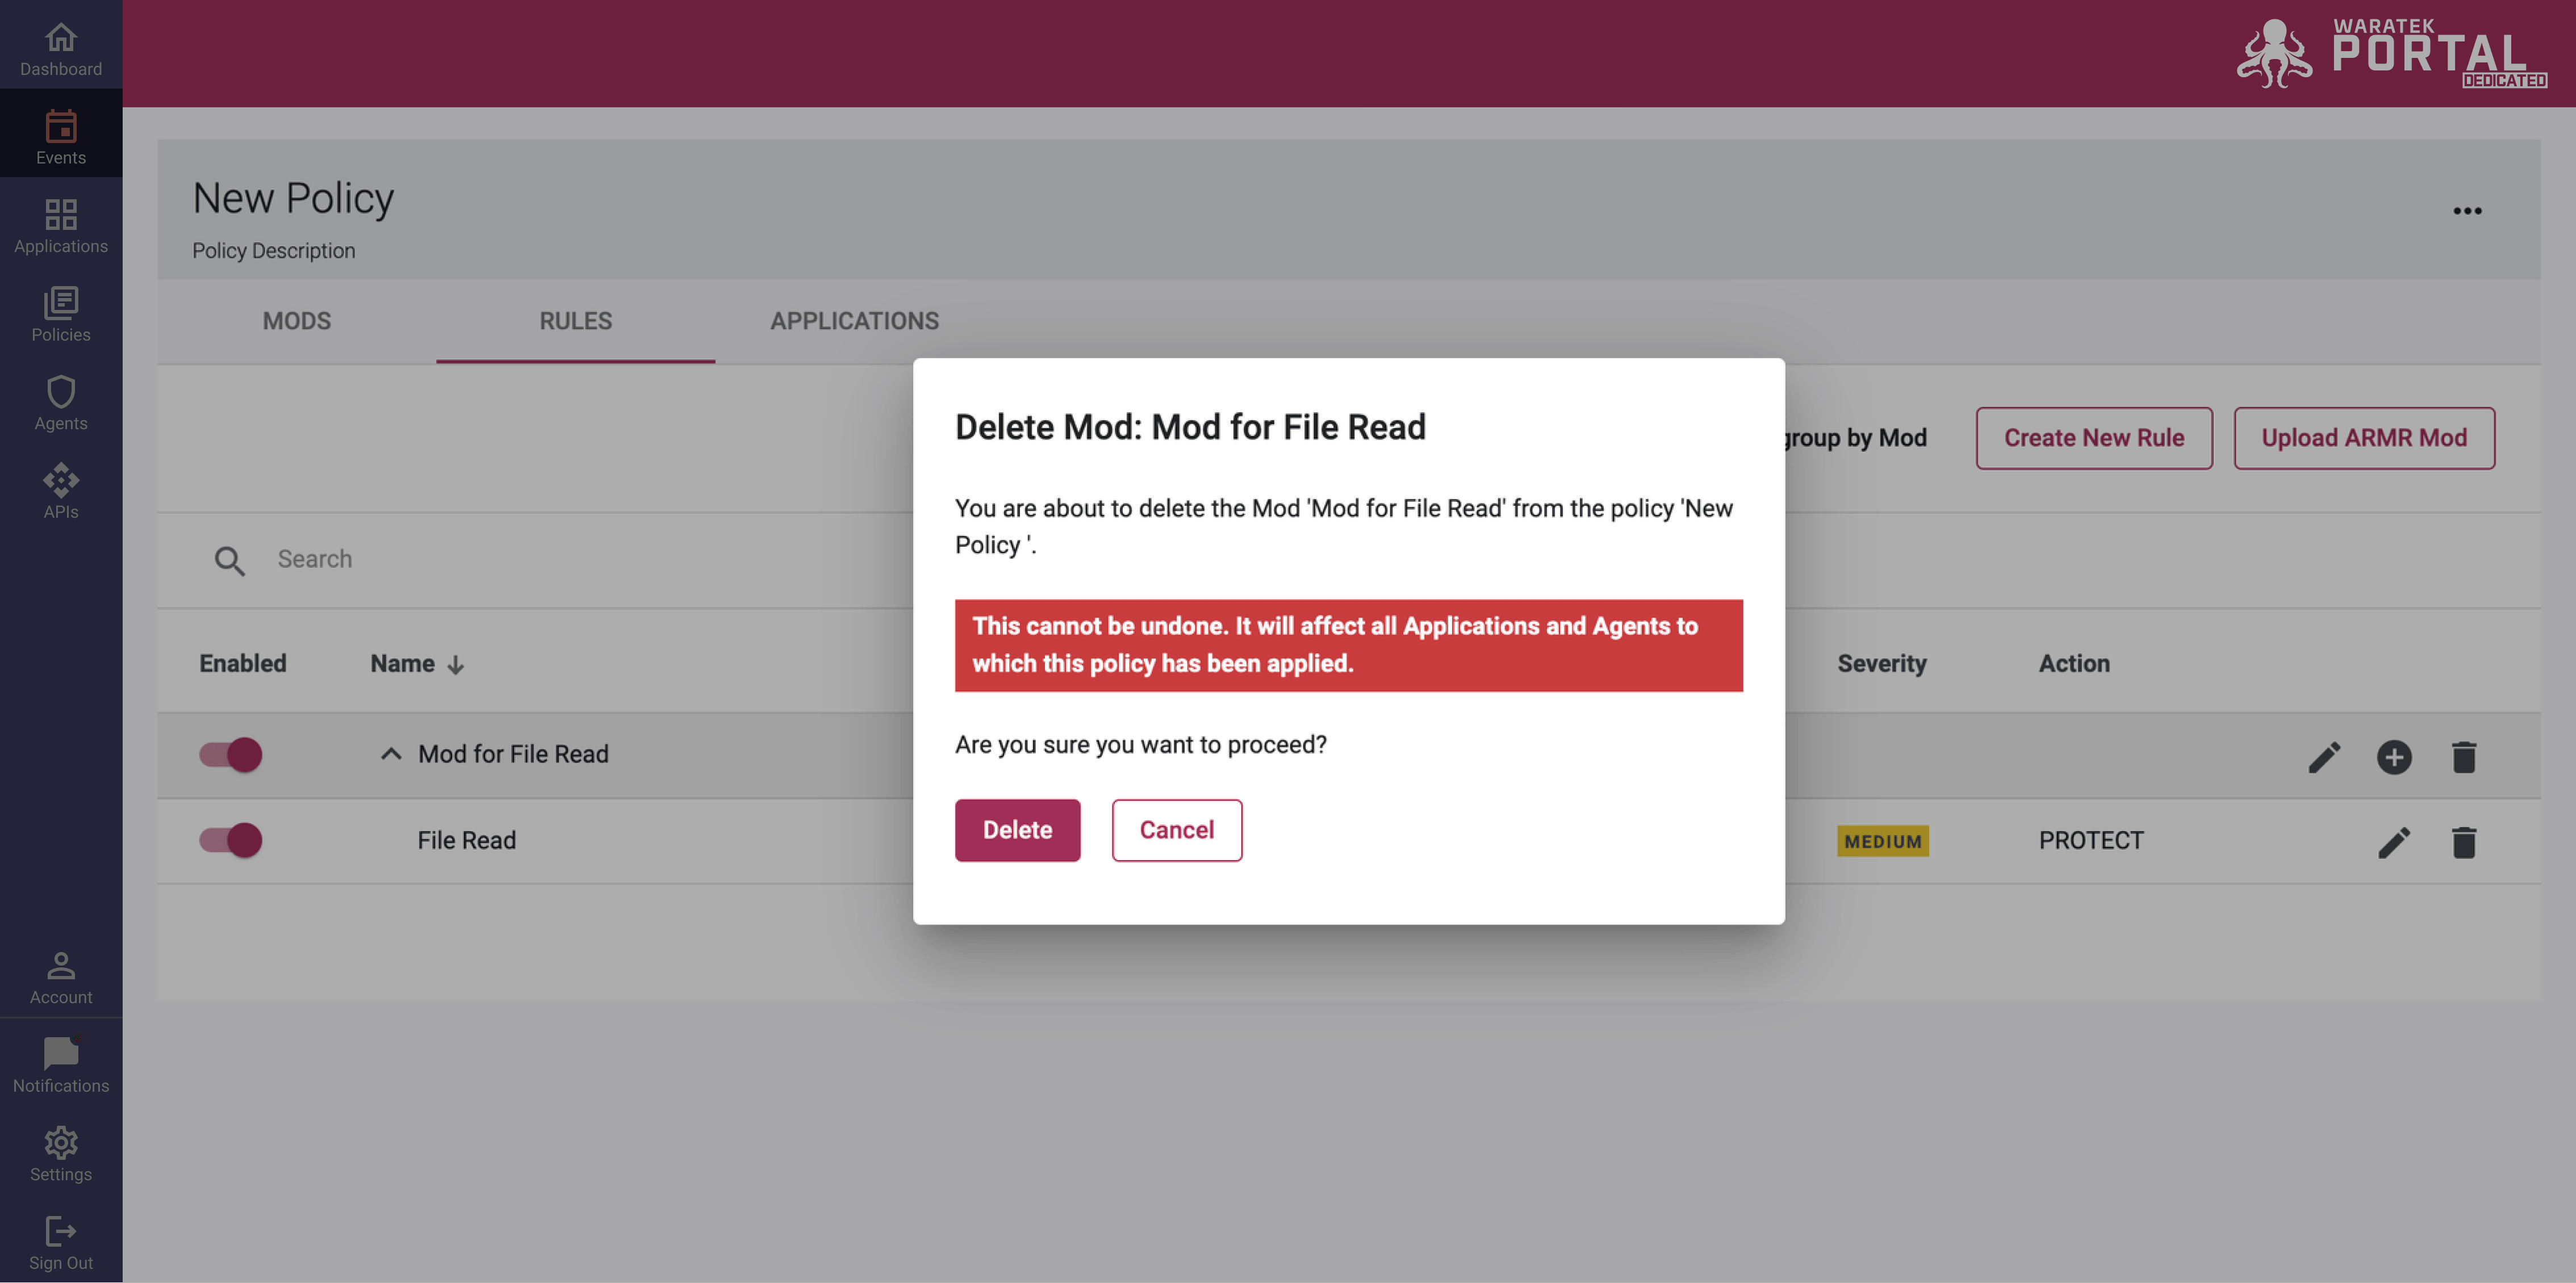
Delete a Mod
If you wish to delete the entire Mod and all of the Rules contained within you can:
- select the Delete Mod option from the dropdown icon
 on the Mod Details page OR
 - select the delete icon on the Mod's row under the Mods Tab on a Policy Details page
Delete a Policy
To delete a Policy and all of the Mods and Rules contained within, you can go to the Policy page and select the delete icon on the policy's row on the screen.
Editing Policies and Rules
Editing a Policy
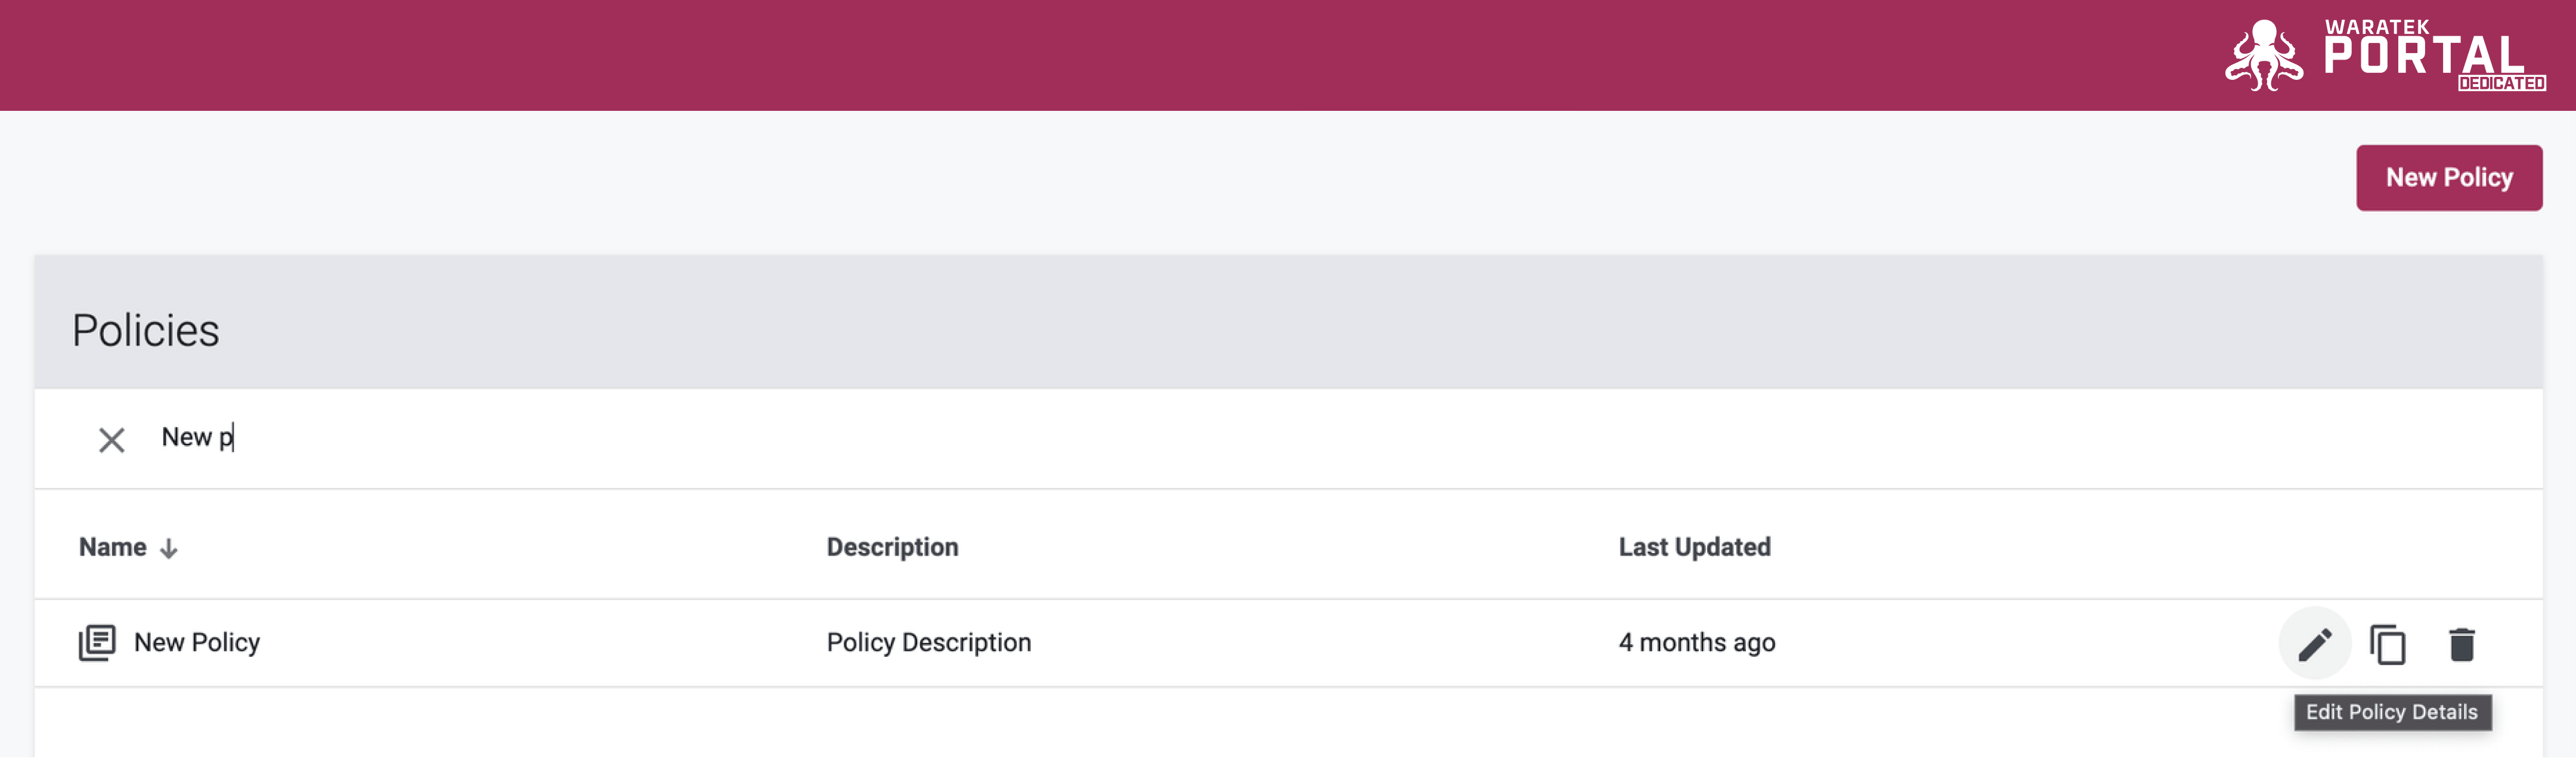
Editing a policy (outside of adding, removing, or changing Mods and Rules) consists of changing the name and description of the policy and the ability to enable or disable mods within the policy. Clicking on the Edit icon on the Policy row will result in a pop-up that will allow you to edit the policy name and description. To enable or disable mods within a policy, you must click on the toggle in the Enabled column to turn mods on or off.
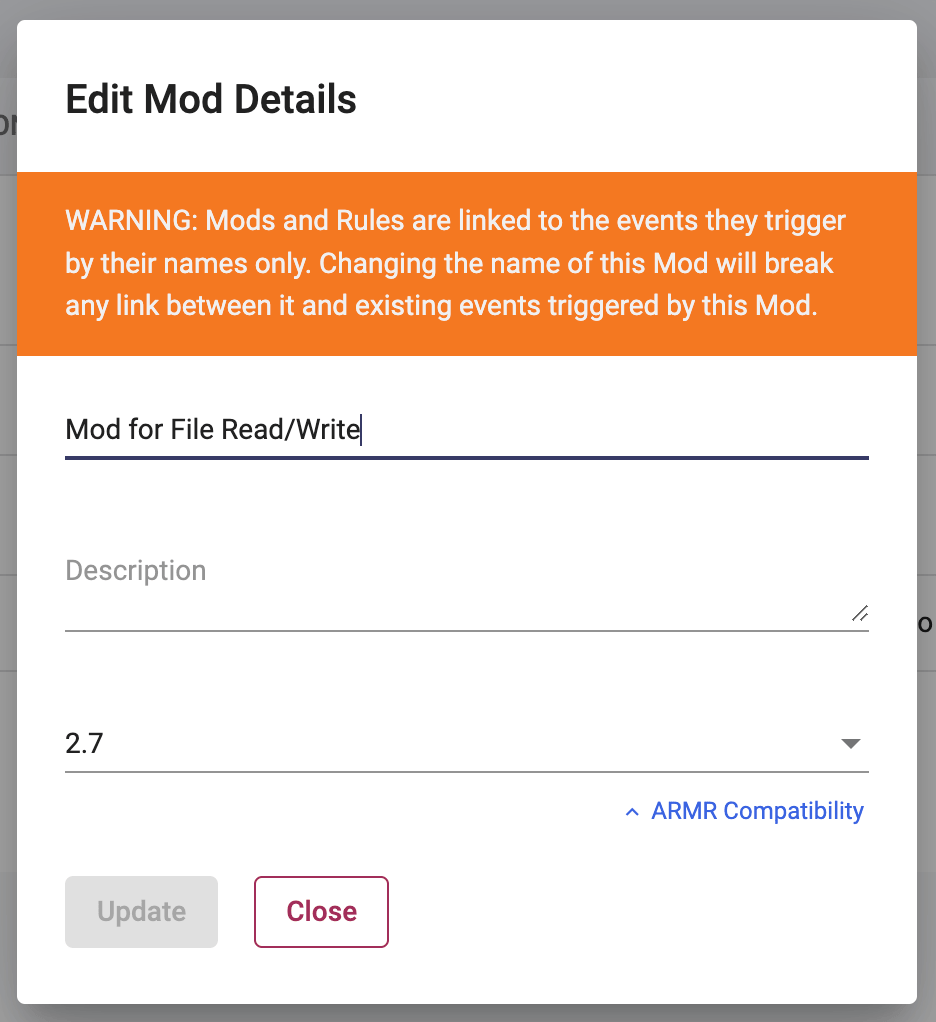
Editing a Mod
Editing a Mod (outside of adding, removing, or editing Rules) consists of changing the name and description of the Mod, the ARMR version of the Mod, and the ability to enable and disable rules within each Mod. Clicking on the Edit icon on the Mod row will result in a popup that will allow you to edit the Mod name and description.
Editing the name of a Mod will break any link between it and existing events triggered by this Mod. A confirmation modal will appear to confirm this action before you can proceed.
When an event is triggered, it is referenced by its rule name. For example “Ted's SQLi Rule.” In the Security Events tables, this is what the rule will be referenced by. If you rename the rule to “Alice's SQLi Rule”, the Portal will view these as 2 separate rules, and any triggered events will no longer be linked together. The same applies for editing Mods.
To enable and disable rules within a mod on the Mod Details screen, you click on the toggle in the Enable column to the left of the rule.
Editing a Rule
Editing a rule allows you to change the rule name and all other rule parameters. A rule can be edited under the Rules Tab within the Policy Details page or on the Mod Details page. On either page, you can edit a rule by clicking on the Edit icon in the rule's row. This will bring up the Rule Wizard dialog for that rule type with all of the parameters and options for the rule configured and displayed in the UI. From here you can make changes to the rule and then save or cancel those changes.
Duplicating a Policy
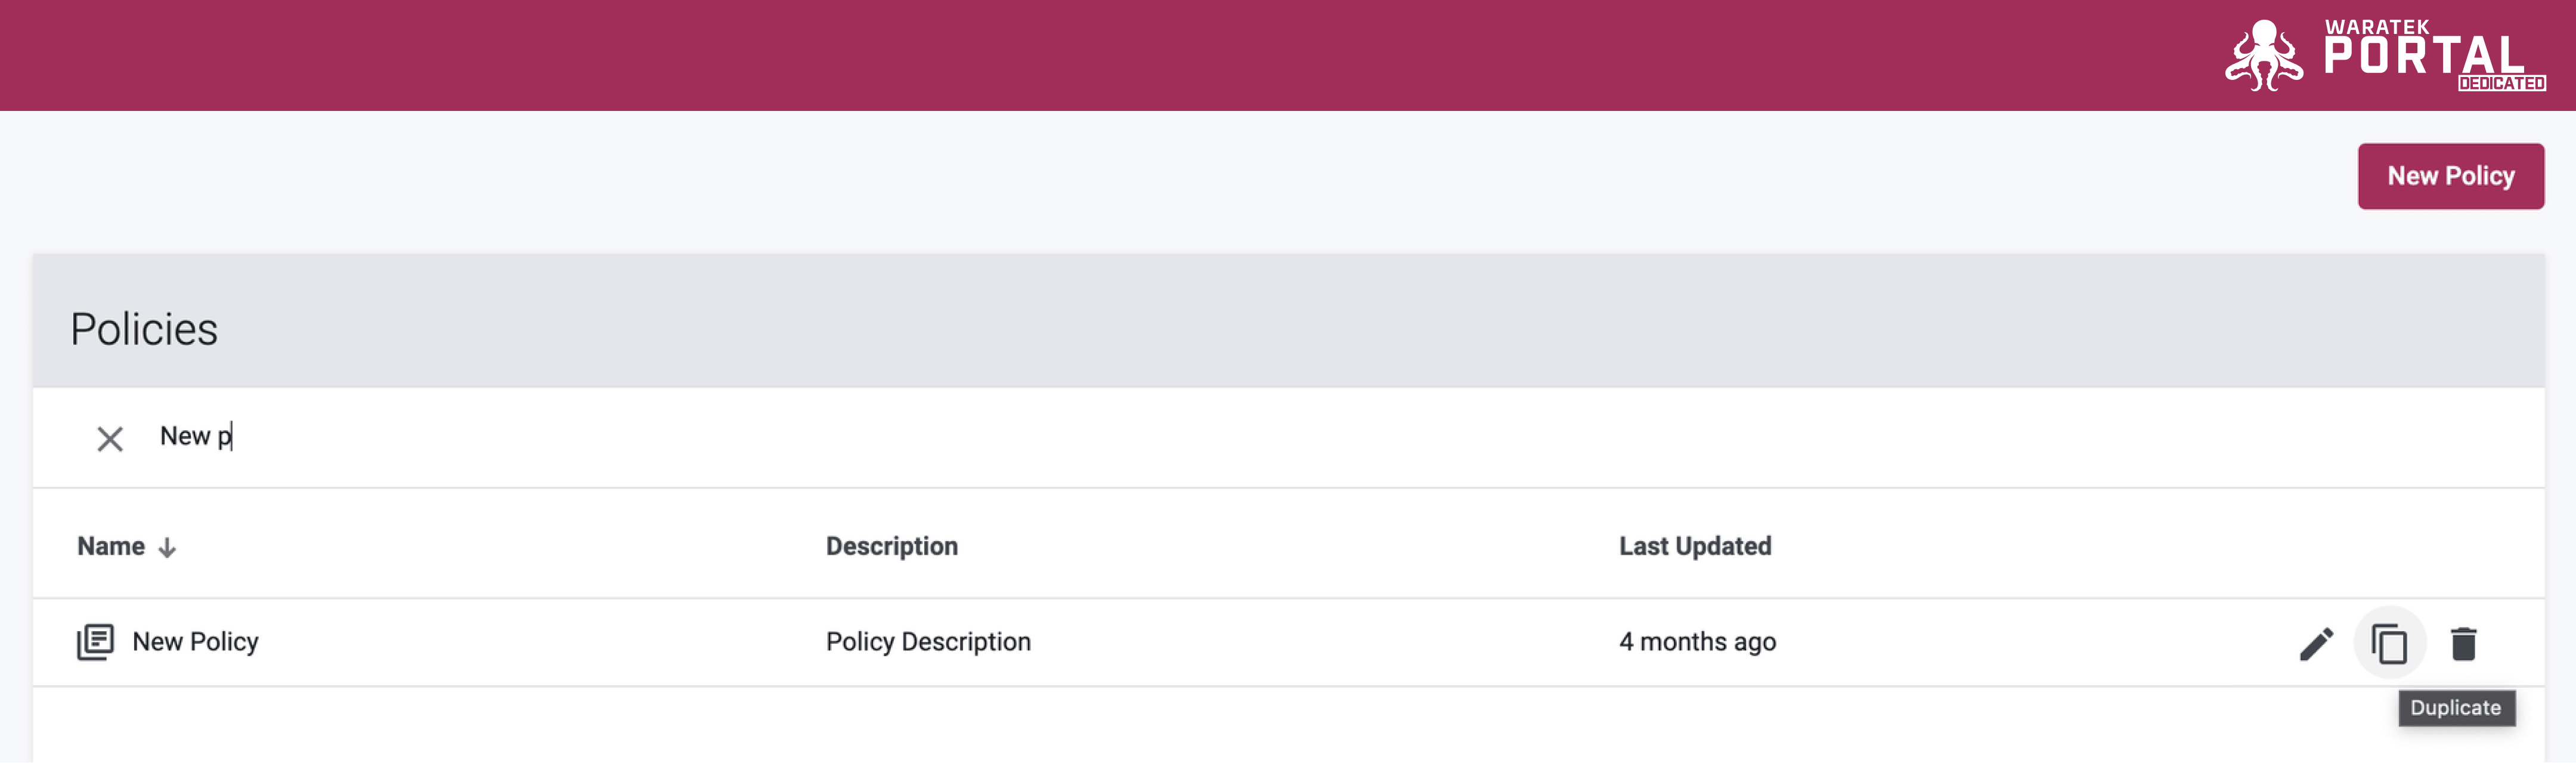
Any policy can be duplicated to be used as a base upon which a new policy can be built. To do this you need to navigate to the Policy Page and select the Copy icon  on the policy row
Exporting a Policy
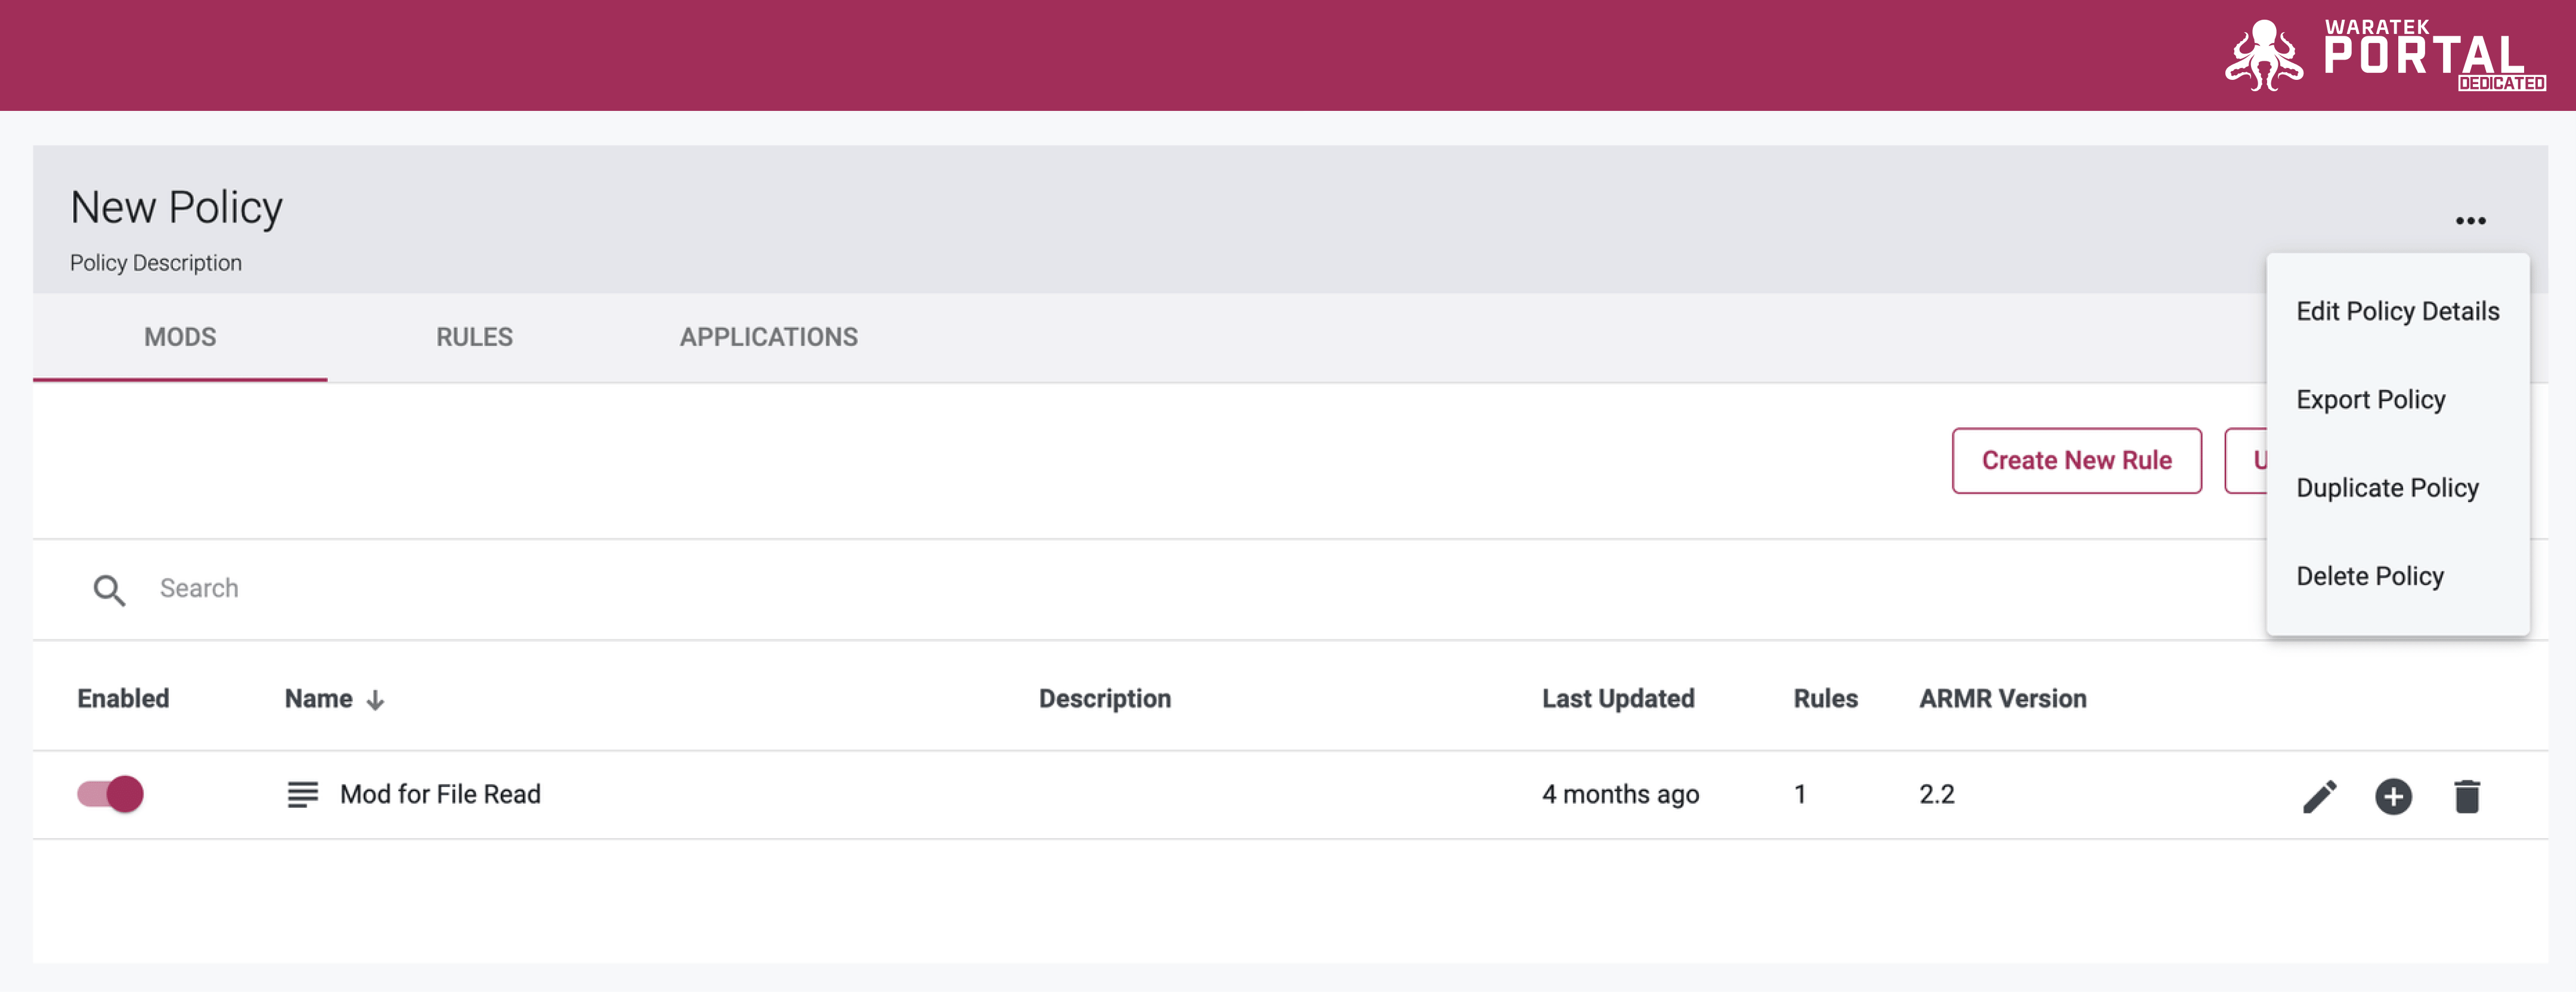
Any policy can be exported as an .armr file and saved to a local desktop. To export a Policy, visit the Policy Details Page, click on the More icon and select the Export Policy option from the dropdown menu. A local save file dialog will appear, allowing you to save the policy to your local drive.
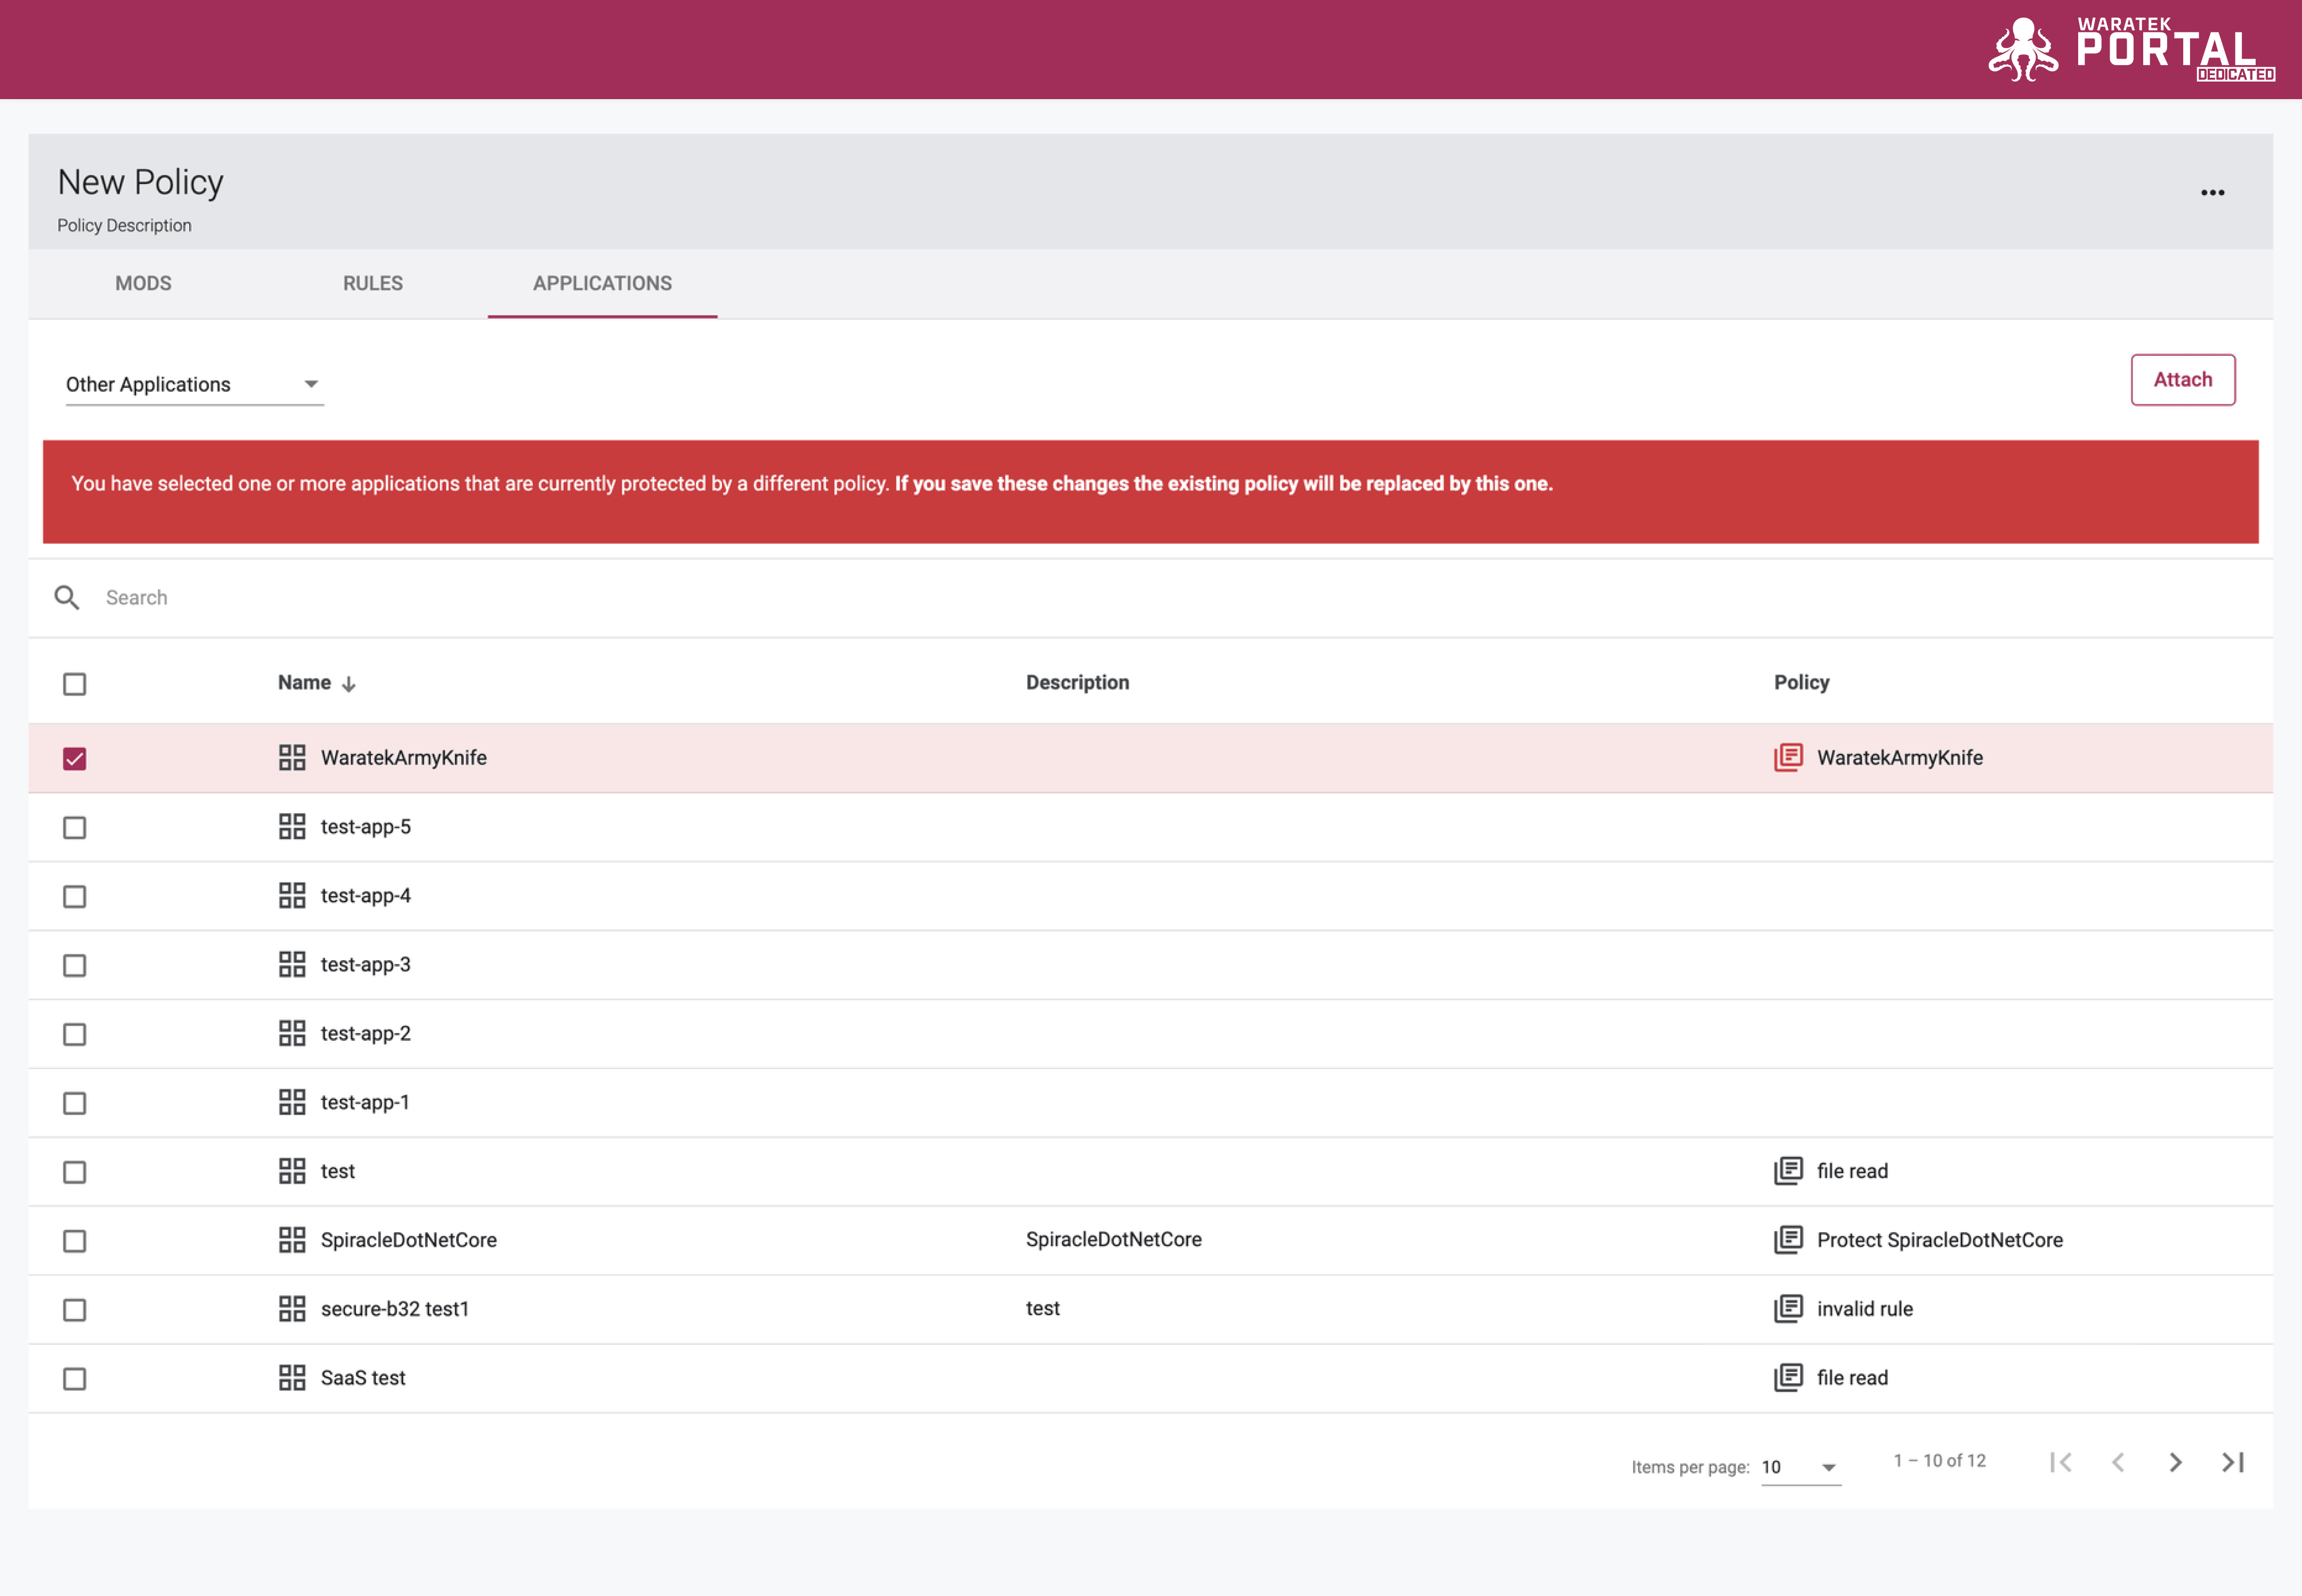
Attaching an Application to a Policy
To attach a policy to an application or remove a policy from an application, you must first navigate to the Applications Tab within the Policy Details page.
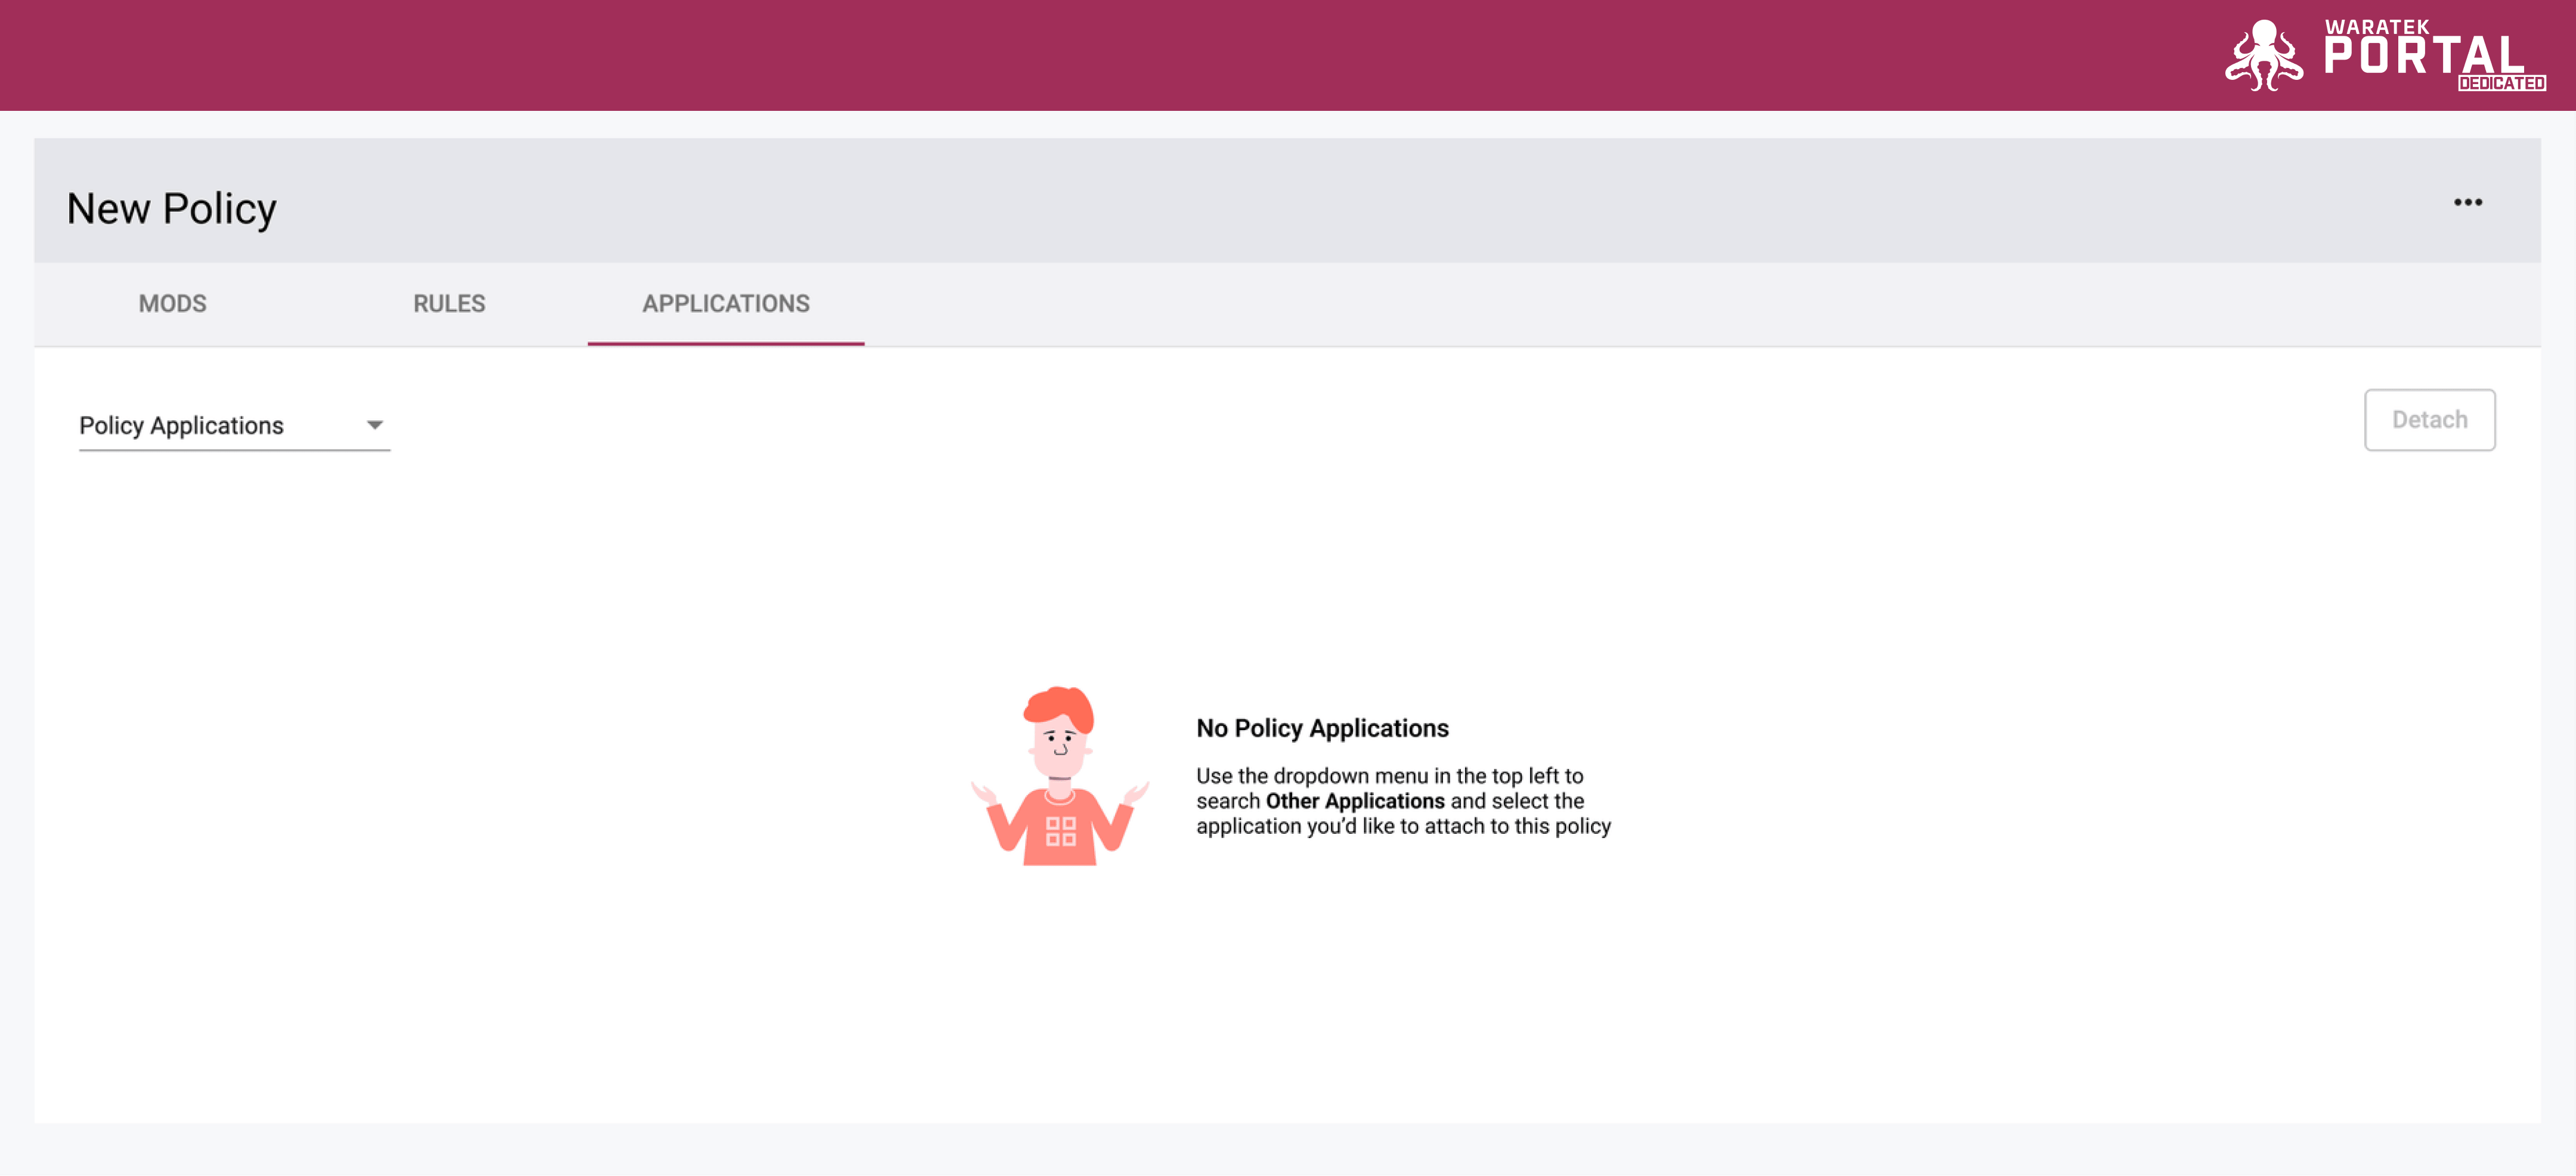
Next, you must select the Other Applications view from the dropdown menu on the top left of the page to see all Applications not currently attached to this policy. Once the screen updates you can select the checkbox(es) beside the Application(s) that you want to attach the policy to and then click the Attach button on the top of the page to confirm your selection.
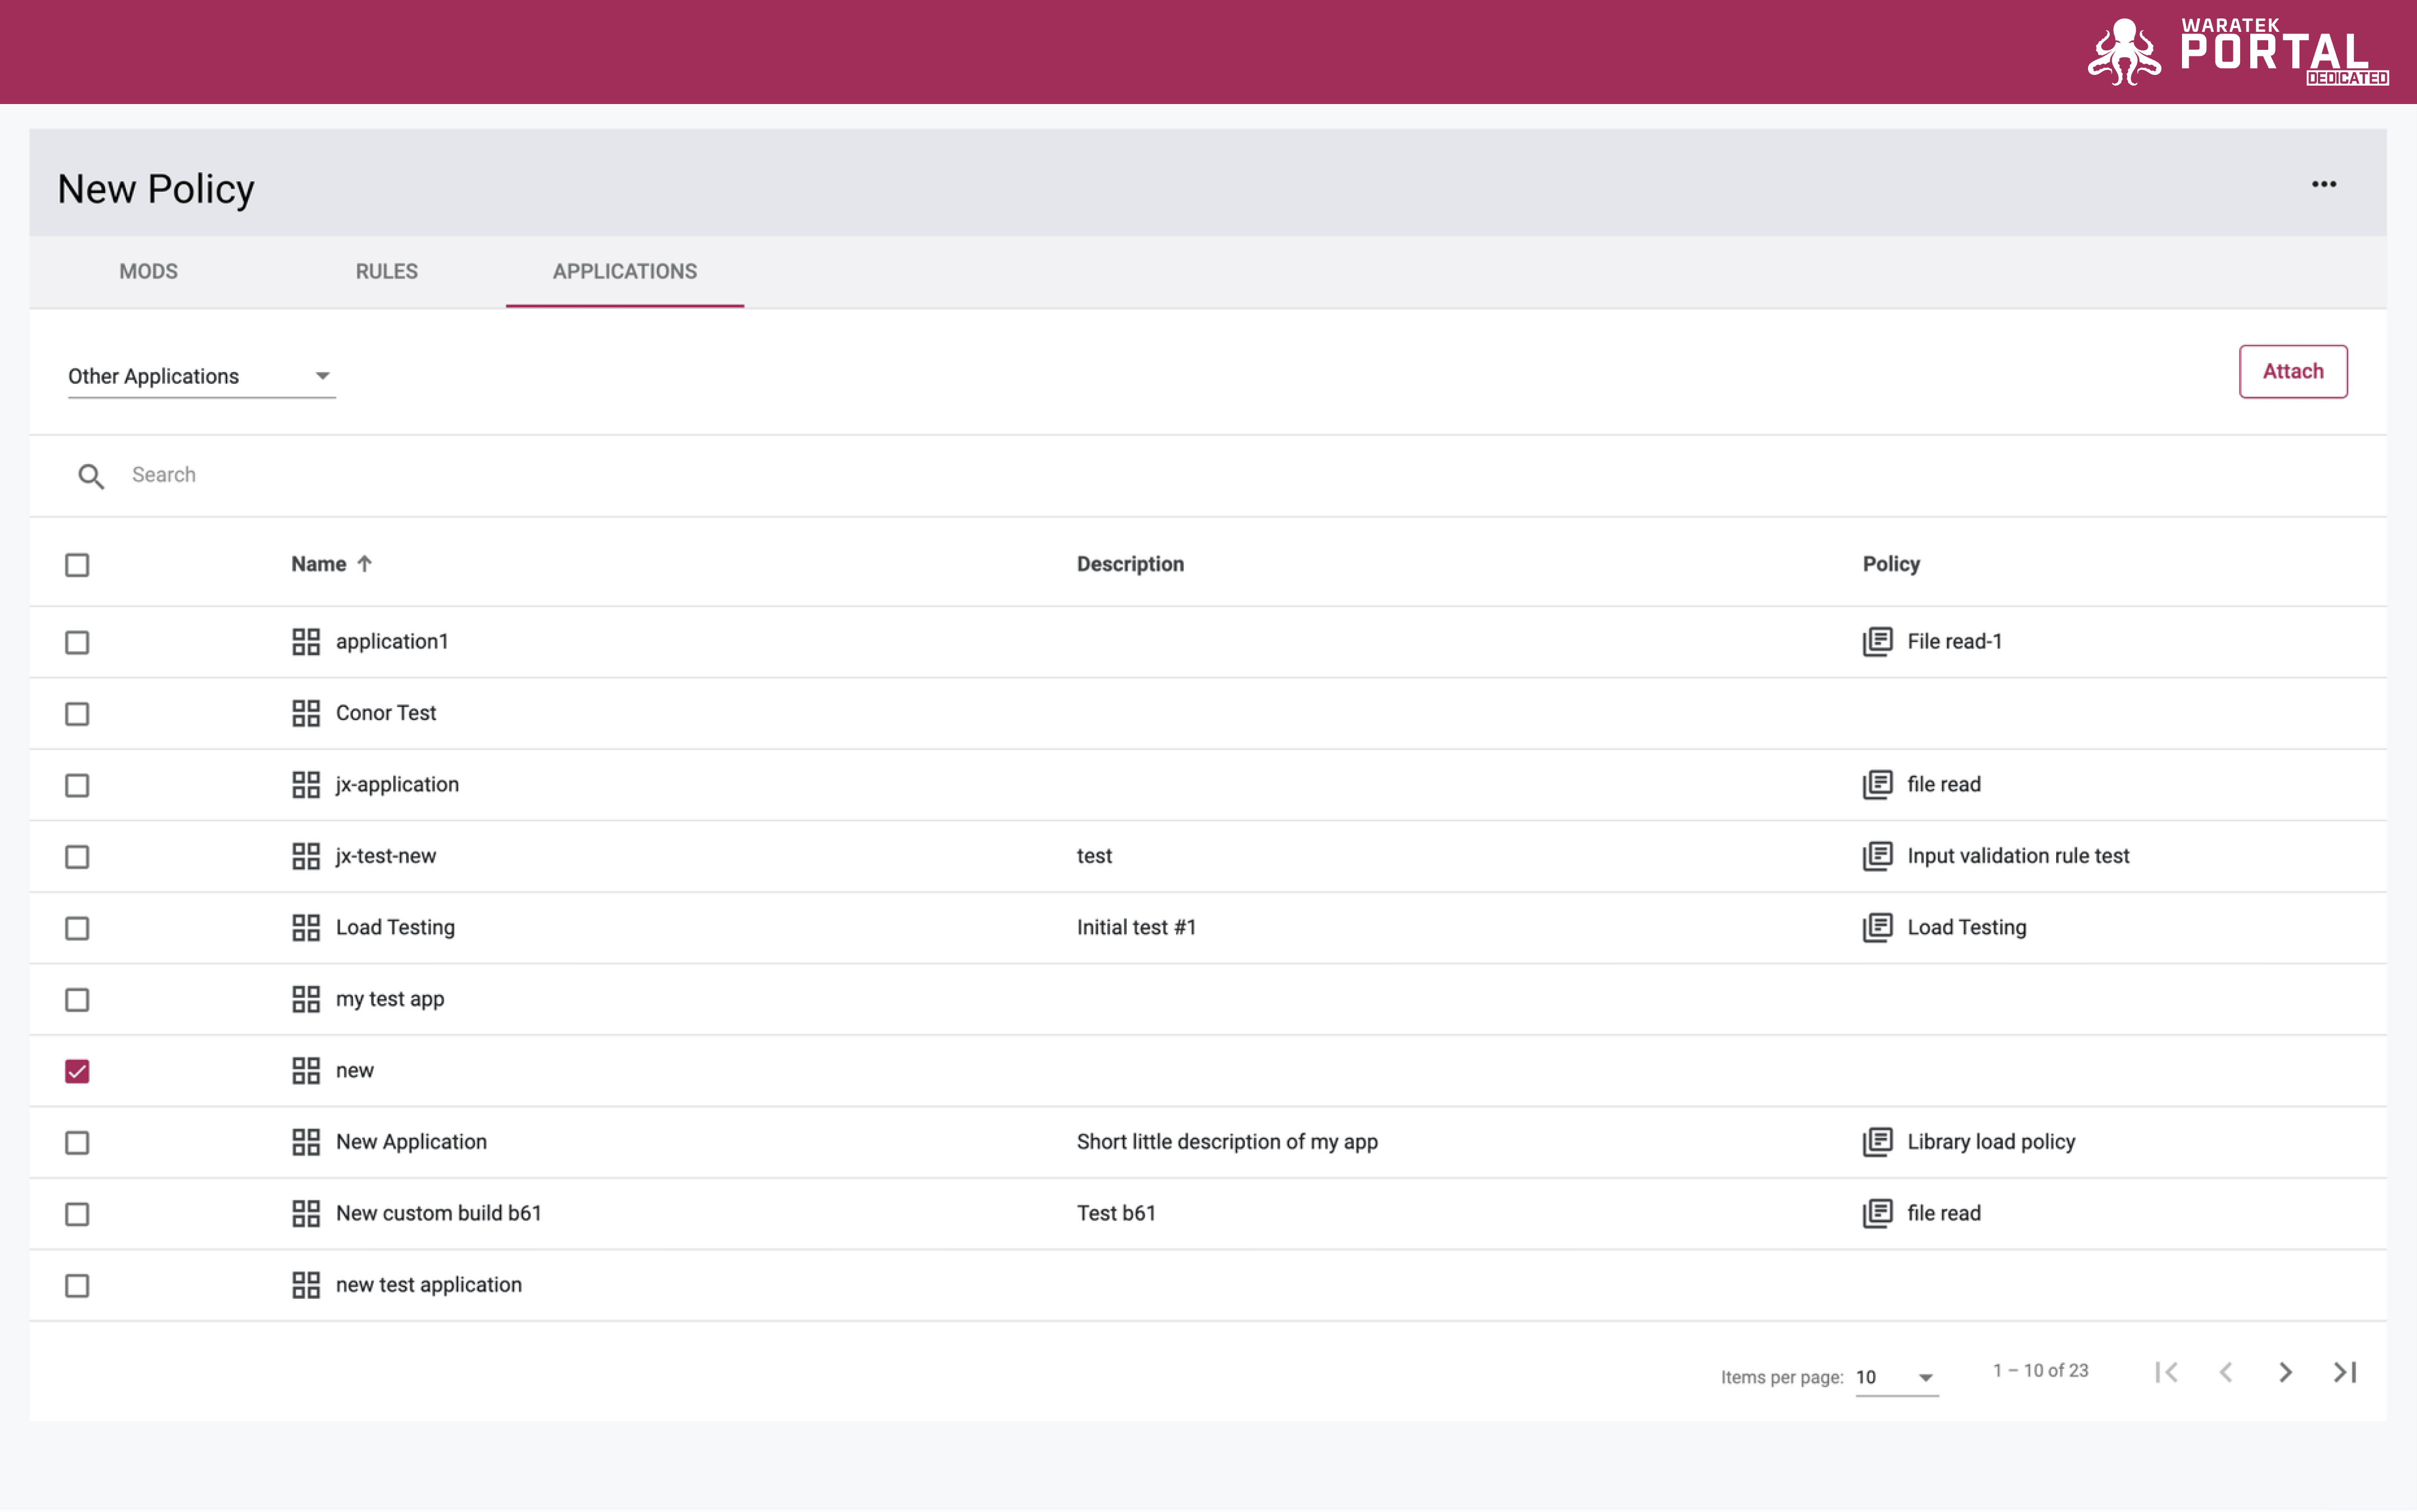
If you select an Application that already has a policy attached to it and you save your changes then the existing policy will be replaced by the one you have selected. A red notification banner (see image below) will appear to notify you before you complete the action.